Peter Michalak
Registered
Several months ago, my brother and I purchased a cheap Cocoon 3D printer from Aldi for some HO scale projects we were working on.
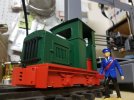
While hunting through thingiverse, I came across a design for a small 0-4-0 diesel (here: https://www.thingiverse.com/thing:2109286), which would be perfect for hauling my LGB Field Railway cars - The attachment shows where its at at the moment - ready for detailing")
The design is based around the use of an IP Engineering Budget Chassis - does anyone have any experience with these chassis', and would you recommend them or something else?
IF you'd recommend them, whats the best way to control speed/add rechargeable batteries etc?
While hunting through thingiverse, I came across a design for a small 0-4-0 diesel (here: https://www.thingiverse.com/thing:2109286), which would be perfect for hauling my LGB Field Railway cars - The attachment shows where its at at the moment - ready for detailing
The design is based around the use of an IP Engineering Budget Chassis - does anyone have any experience with these chassis', and would you recommend them or something else?
IF you'd recommend them, whats the best way to control speed/add rechargeable batteries etc?