3D Printed 1:29 Detail Parts

supagav

USA standard gauge in the late 1960's, in 1:29th.
Hi folks,

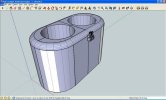
I just wanted to share a few thoughts I`ve been having about how to try and make my own detail parts to try in an attempt to improve the look of our 1:29 US diesels. The problem I have always had is that there just aren`t as many parts for the kitbasher as there are in the smaller scales like HO, so I`ve always had to fabricate them. With this new 3D printing craze I thought I would try and see if I can mock up some simple detail parts like headlights etc to help me achieve a more detailed finish.

Here is a special SP style oscillating headlight called a Gyralight, which I`m trying to make in 1:29. Many thanks to James Hilton (and his blog!) for the 3D printing inspiration. I`m still not really there yet but I thought I would share my progress so far:

screen 1 (Copy).JPG


674x501_1654762_2044178_1390555032 (Copy).jpg
 

Attachments

  • screen2 (Copy).JPG
    screen2 (Copy).JPG
    43 KB · Views: 20
  • screen3 (Copy).JPG
    screen3 (Copy).JPG
    34.4 KB · Views: 203
And here are some pictures of the real thing:

image004.jpg

image008.jpg

20585.gif

20585p.gif
 
I must say though that I am no product designer, and claim no experience or skill with these things! As such, any thoughts, suggestions or criticisms are warmly welcomed.

I have one test piece coming soon so I will try and post some pictures of how it turns out.

Thanks for looking,
G

... and lastly, the real thing in real life, on an SP GP9 diesel:

SP 3455_LAMPS_edited-1.jpg
 
Hi,

I know this thread is probably getting a little too geeky and specialised so please accept my apologies, I am a self confessed detail nerd.

I just wanted to share a few photos of the prototype of the Gyralight I got back today. I finally received the master from Shapeways and I must admit I really am pleased. The fidelity to detail that is possible to print is amazing, I almost have to use a magnifying glass to see all the nut and detail I drew for the catch and hinges!

If anyone is at all interested in these kind of things, I am going to make all of my parts and details available to print through the Shapeways website. I hope to do some other lineside details like relay cabinets and electrical boxes, as well as a whole series of US diesel detail parts to complement those already available from Ozark miniatures.

Anyway, thanks for looking!

IMG_1442 (Copy).jpg

IMG_1443 (Copy).jpg

IMG_1445 (Copy).jpg

PS: I`m going to detail up a Norfolk & Western GP7 into a GP18, which will use these parts so I`ll post up some photos as I use them.
 
:o mind blowing, not too geeky at all, the devil, Is in the details!!
 
Interesting! What is the material you have chosen and the minimum detail size you have used in your model?
 
Nicely printed... I would like to know all the sordid details, like what printer you used, how long did they take to print etc etc....
Its the way of the future especially for repetitive tasks, or short "production runs".... Within the next 10 years everyone will be using 3D printers. They seem ideal for "details" and I recon will soon replace resin castings and would even at this stage be cheaper taking into consideration the cost of the machine and consumables vs the cost of making a master, silicon rubber and resins...
 
What is the life of these materials?

I have seen Pola buildings which have been outside for 20+ years, and the integrity of the plastics still seems good, and colours are faded, but still good.
I wonder what these materials resistance to UV, thermal, and wet/dry climate cycles will be like??
 
Thanks for the comments,

Trev: first up I can only disappoint! Shapeways handle all the technical side so sadly I can't delve into it any further! I would very much like to be able to print it myself but sadly I just don't have the cash to afford that kind of kit, good enough to print the fidelity that I look for. I provide the drawings in the form of a 3D mesh file, and then select the material which is most appropriate for the output. For these I used a special type of clear acrylic they call "Frosted Ultra Detail" which can be printed right down to between 0.2mm - 0.3mm. It's great for these types of traditional detail parts which have so long been available in HO from the likes of Details West and others, but have sadly been lacking in the large scale market. Ozark still produce some good white metal parts but their range is limited and most of the time we have to fabricate this kind of detail ourselves.

Phil: I really don't know to be honest! The detail acrylic I used for these parts is fantastic but it is soft like thin styrene and thus I really don't think it would be good for any kind of heavy exposure. They do have other plastics and metals that probably would be far more weather resistant so it is definitely something to think about. I'm currently working on a few lineside details such as relay cabinets and telephone boxes, so this time round I am trying to make some the edges a little less fine, that way I can use a more durable plastic (and help keep the production costs down too!)

Thanks again for looking,
G
 
Here is another I`m working on, it`s a round concrete style telephone or instrument box. It`s taken from some original plans and diagrams and is designed to represent a style that was very common in the US during the steam and early diesel eras, before the arrival of more modern means of communication:

Telephone Box (Copy).jpg
 
Gav, a similar telephone box was used by the South Australian Railways from the 1920s onwards. The Commissioner of Railways William A. Webb came from the MKT and introduced a lot of American practices in terms of locos, rolling stock, signalling and train control.


Attachments

  • SAR S&T Phone Box.jpg
    SAR S&T Phone Box.jpg
    17.9 KB · Views: 27
Thanks for the photo, that's brilliant! Many thanks for sharing it :)

I never knew that about US connection, every day is a school day as they say!
 
Back
Top Bottom