Track making/making tracks: the good, the bad and the ugly, advice and thoughts wanted, explanation is giving(incl mistakes)

Ensure:
a) don't contaminate each roll with particles from the other roll.
b) wrap it up tight to keep the air out.

As it is a chemical reaction, then in theory if not mixed, it will last a long while, however as with most things will "go off" eventually, had mine about 5 years since first opened and still good.
When I first started with Interserve (based at Sandhurst) my shared PA was related to the makers of Milliput, and I had an unlimited free supply every time she visited her relatives in Wales.
 
Before i am going to wrap this all up and make it final, there is one more experiment in the make.
I really dont like those 3mm gaps between the safty rail and the head rails, nor the 3mm gap in the frog.
I am about to make some 3-4 meter lenght curve, with at intervals safty rails with gaps starting at 3mm 2,5mm, 2mm, 1,5mm and yes even 1mm.
For radius at 2, 3 meters and 5 meters..

I hope in upcomming weekend i can wrap it all up, with side notes, yes there are some tricks and pits
Probably teaching my grandmother to suck eggs, but the secret of the safety rail is not the gap to the running rail, but in the back-to-back measurement of the wheelsets.

Generally for 45mm track, the back-to-back is 40.5mm; so even the monster LGB wheel flanges can cope with a gap between safety rail and running rail of 2.25mm ..................... I think, if I've done my sums right.

But, anything less than that is going to cause running problems unless your wheels are to very fine standards.

I use standard LGB and Aristocraft (Bachmann now) track (oh, and one single USAT point) and I have quite a lot of Accucraft rolling stock with finer wheel dimensions (not fine scale) and everything runs through the standard point geometry OK.

Remembering your ambitions for a Russian monster steam loco, I discovered when I went to the museum section of a preserved railway, that 1:1 practice for keeping large, rigid locos on curved track is not to meddle with the back-to-back, but to increase the width of the tyre. I found this out because outside the museum, where the track was set in a hard surface, there was evidence of a loco wheel damaging the surface for an inch or two outside the rail head. I went inside the museum, and found the guilty culprit, 'Gordon' (from Bordon) a UK 2-10-0
 
@Rhinochugger
My goal is nmra1, i hope the link will work.


20260501_163514.jpg
20260501_163404.jpg


Back to back 41.5, flange 0.75 to 1mm max, ofcourse at the base a bit thicker.


My loco's are going to be self build and yes also i bought some from Marklin (mk1??)
And one loco for testing tracks (new layed and for new running time) from lgb, find on catawiki for 75 euro.

Wow, Gordon really is a beautiful loco, i even add that one to my list

that 1:1 practice for keeping large, rigid locos on curved track is not to meddle with the back-to-back, but to increase the width of the tyre.
That i fugured out the hard way.
One of the last experiments i was stuck again and again on the wheels in the curves with the turnouts.
I went from 4 mm wheel thickness to 6mm, it looks more nature also if i am looking at the pictures.
Now those 6mm wheels still need to have a test drive, so with this and your info, i think it will run ok?
We will see.
The frame and tender are after completion 1 meter and 7 cm long.
Anyway i must stop drowling and get to work.

Regarding the lgb "test" loco, it would run on fine scale.
 

Attachments

  • 20260501_163416.jpg
    20260501_163416.jpg
    445.2 KB · Views: 1
Probably teaching my grandmother to suck eggs,
No it is not, there is always that small piece of info that combines the greater things!
Thanks for sharing.

I am going to wrap this up, if i can find everything.
Scatered all over the place.
 
I didn’t find any of the failed experiments, apart from this one and the ABS 3D‑printed ones.
It lines up with my timeline over the last couple of years, anyway.

20260501_172045.jpg

Still getting used to my new camera.
This was an experiment with a “cheap” adhesive glue.
Didn’t work at all. I’ll end this wrap‑up with the only one that actually works, and no, I’m not affiliated with them.

I’ve tried a whole range of glues, and none of them did the job.
And yes, you do need to sand the bottom.
I’ll make a proper step‑by‑step thread on how to build good track.

In this test, the wood was dry and the alu was sanded…But as you can see, the adhesive basically vanished.
It turned brittle and hard, and the sleepers just fall out over time.


20260501_172231.jpg

Apologies, the photos are NOT in chronological order.

These is my 3×3 way switch. I’m genuinely impressed by how well the conifer wood held up.
It spent three years in the garden without protection.
I tested several wood species and three clearly came out on top: Conifers, tame chestnut, and bankirai.

Bankirai is also widely used on full‑size railway track sinds ? 1850?
Standart in 1920?
Oak and similar hardwoods might work, but I don’t have real‑world data on those yet, and will not come, sorry

All the wood mentioned here was left outside for 2–3 years, completely unprotected, at one point grass was growing over it.
Worst case scenario in that respect.


Regarding the gap:
20260501_172346.jpg
20260501_172356.jpg
From an aesthetic point of view, I like this a lot.
Even the LGB test loco rolled through it “happily”… well, in an old‑man sort of way.
It even produced that real‑life squeaking noise you hear when a loco enters a curve.
But I’m still not keen on the frogs.
The gap (whole thing was test) is varing from 1.5mm to 2,5mm, i really like 1.5mm for the looks.

Yes, adhesive everywhere. I’ve since figured out how to prevent that, and I’ll go into the details in a separate thread.


20260501_172646.jpg
ABS 3D‑printed parts expand and contract, and both of these were in full sun.
No adhesive used, just friction grip.
So the alu creeps out
Unfortunately, ABS has another issue: it becomes brittle over time.

PLA also shrinks significantly, sometimes up to 30%.
More details on 3D printing will come later…


20260501_172736.jpg

Local pickup, including the remaining 3D‑printed test pieces.


20260501_173018.jpg
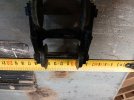
Here’s my ABS scissors 3D print.
As you can see, it creeps outward over time.
The aluminium strip is the only thing keeping it straight… and the 5‑way turnout will be even more interesting.(worse)

ABS also bends noticeably with temperature rise.


20260501_173033.jpg
And creeping out.

20260501_173107.jpg
It deforms way too much to be usable…


20260501_173137.jpg
I wasn’t a fan of the frogs anyway.
They’re also available for local pickup, note that they’re NMRA‑1 standard.


20260501_173214.jpg

Credit where it’s due: @gerik (?) deserves a compliment for his cement bond.
Naturally, I had to test it year after year, which is why there’s almost nothing left.
However, that last piece of cement is still performing well.

The ties/sleepers are made from 1 cm PVC foam sheet.
According to the specs, it maintains its dimensions from –10 °C to 50 °C, though I haven’t verified that.

The adhesive used was Polymax High Tack.
If I weren’t a wood man, I’d probably have hired someone to cut the PVC foam sheets for me.
They also come in a brown colour.


20260501_173457.jpg20260501_173502.jpg20260501_173657.jpg


20260501_173436.jpg20260501_173448.jpg

The 5‑way switch demonstrates it clearly: ABS 3D printing is NOT suitable for this scale of things.
It creeps, deforms, and becomes brittle — well beyond the operational limits of ABS.
ABS prints are only viable for single track and typically last around five years.
PLA may last longer, but shrinkage can reach significant levels.
PLA can be heat‑cured at 65 °C. adjust accorndingly.
When lifting the assembly, components broke off due to brittle ties/sleepers.


I’ve reached the picture limit…
 
20260501_174304.jpg20260501_174307.jpg20260501_174323.jpg20260501_174333.jpg20260501_174356.jpg20260501_174415.jpg
This type of frog is one I like very much. It was used during the Soviet era I’m modelling.
I’m still not certain (I forgot the exact timeframe) when they transitioned to manganese or solid frogs, several experimental designs existed back then.

Also observe the gaps between the running rails and the safety rails.

One photo shows a 2.0 mm gap, which I prefer.I also noticed a error: one frog nose has no sleeper support, and another has only 50% support.
The remaining ones are correct.


20260501_174924.jpg

Somewhere I should still have a fully working turnout using those motors.
I bought several of them on AliExpress, also intended for my self‑built locomotive.'s


20260501_175035.jpg

This is the ONLY adhesive that actually performs the way it should, and the way I require it to: bonding aluminium strip to bankirai.
Note: it’s not cheap, and it must be applied warm (around 25 °C).
Throughout this thread I tested a large number of adhesives.
All of them failed, except this one.
And no, I have no affiliation with the manufacturer.

To summarise: this thread contains plenty of mistakes and succeses, including some amusing ones, but that was intentional.
It was all about testing and learning.
Thanks to the expertise shared by forum members, I can now start building my long‑planned garden railway.

I’ve narrowed everything down for anyone interested in building their own track: inexpensive, reliable, and suitable for batch production.
In this thread I tested every component (including frog casting) required to build track, along with the tools and jigs.

And no, you don’t need Hilti, Milwaukee, or Festool, other (cheap) brands work perfectly well.

Learn Templot and use the tools, I’ll walk you through the entire process, from initial design to a fully functional end result in a new thread.


With best regards Igor

PS: For new readers, I suggest starting at page three. You’ll even see my English improving as the chaos unfolds.
 
Last edited:
I am using PETG to print points these work well. I paint them with UV resistant paint. They are holding up in the australian summer sun so far.
For the creep have you thought about a pin through the rail that drops into a slot in the sleeper, constrains it but allows movement for temperature a few at intervals may be all that is needed.
Did you try epxoy glue and construction adhesive?
 
Back
Top Bottom