You are using an out of date browser. It may not display this or other websites correctly.
You should upgrade or use an alternative browser.
You should upgrade or use an alternative browser.
(RhB) Kk-w Niederbord Engineering Wagon (Upgrading the LGB Model)
- Thread starter Parkdesigner
- Start date
Parkdesigner
Registered
Right, so - today’s progress.
Today saw the final bits of yellow spray onto the body, followed by a wash of Testors Dullcote.
I also mounted the S-Kuplex to the build, and readied the frame for the body.
As I’ve progressed the build, when I have down time waiting for paint to dry, or glue to set, I’ve been cutting deck boards. I started with several long strips of basswood from the LHS. After cutting and sanding enough boards (plus a few extra) I did a test fit in the car body. I also cut additional boards to plank the platform end of the car.

Next step, was to distress the boards ever so slightly. The basswood as it comes looked too… unfinished. While I’m a fan of keeping my railway equipment in respectable shape, I do enjoy a touch of weathering here or there - including getting the wood (or faux wood) decks a little weathered. I added a few drops of Model Master Flat Engine Black acrylic paint to a small pot of water, and using a brush, I simply painted on the grimy water to each board. I then flipped all boards and repeated the process (just painting one side caused bowing, but painting the reverse effectively canceled out the distortion).
Once dried (several days left to sit), I then mounted all planks to a bit of scrap cardboard and gave them a thorough spray of dullcote. Again, waiting a day to dry, I flipped them and repeated the process.

Then it came time to glue in the boards.
I used a wood glue here in the states called Titebond III - versatile stuff I’ve used for years on wood kits in 1:20.3 with (thus far) no major problems. Typically, when gluing I’m a bit sloppy with the application as I want as much bond as possible, I know any over-glue will dry clear, and ultimately will be painted. However, as this is not a freight car body, but rather exposed decking, this called for a bit more care. I used micro brushes to “paint” wood glue on to the back of each plank, and then placed the strip into the car body one at a time.
(For those of you wondering how long this takes - Die Hard was just starting on television when I sat down to install the deck and, I kid you not, I placed the final board into the body just as Bruce Willis was walking out of the building at the end of the move… so, one Niederbord Wagon’s deck = one viewing of Die Hard!)

Once the deck was installed, I was able to begin placing the interior wall veneers. This was rather straight forward using a few drops of CA and some clamps to affix the styrene strips to the inside of the body. I’ve only done the two end walls tonight - I will install the two side walls hopefully tomorrow after I do my last bits of painting to them. (Would have finished that tonight too, but ran out of painters tape midday and still have a little masking left to fishing on the walls.
Overall, I’m very happy with the veneers as I trimmed them slightly shorter than the LGB wall. Mounting them flush with the top of the body walls leaves a slight “gap” between them and the top of the wood deck. By doing this, it gives a nice impression that the walls are movable, rather than everything being just one, molded piece of plastic!


And that brings us up to current.
Sunday I hope to get the side walls finished (painted and installed), as well as install the platform decking. After that, there’s not much else to do. Once I’m 100% sure the body and the frame are ready to stay mounted, I’ll glue in the car-end stake pockets (which based on their locations glue across the two major assemblies) as well as installing a final pair of under-frame details (lever supports) that, again, glue across both the frame and the body.
Then, she should be ready to join the others in the engineering consist!
Today saw the final bits of yellow spray onto the body, followed by a wash of Testors Dullcote.
I also mounted the S-Kuplex to the build, and readied the frame for the body.
As I’ve progressed the build, when I have down time waiting for paint to dry, or glue to set, I’ve been cutting deck boards. I started with several long strips of basswood from the LHS. After cutting and sanding enough boards (plus a few extra) I did a test fit in the car body. I also cut additional boards to plank the platform end of the car.

Next step, was to distress the boards ever so slightly. The basswood as it comes looked too… unfinished. While I’m a fan of keeping my railway equipment in respectable shape, I do enjoy a touch of weathering here or there - including getting the wood (or faux wood) decks a little weathered. I added a few drops of Model Master Flat Engine Black acrylic paint to a small pot of water, and using a brush, I simply painted on the grimy water to each board. I then flipped all boards and repeated the process (just painting one side caused bowing, but painting the reverse effectively canceled out the distortion).
Once dried (several days left to sit), I then mounted all planks to a bit of scrap cardboard and gave them a thorough spray of dullcote. Again, waiting a day to dry, I flipped them and repeated the process.

Then it came time to glue in the boards.
I used a wood glue here in the states called Titebond III - versatile stuff I’ve used for years on wood kits in 1:20.3 with (thus far) no major problems. Typically, when gluing I’m a bit sloppy with the application as I want as much bond as possible, I know any over-glue will dry clear, and ultimately will be painted. However, as this is not a freight car body, but rather exposed decking, this called for a bit more care. I used micro brushes to “paint” wood glue on to the back of each plank, and then placed the strip into the car body one at a time.
(For those of you wondering how long this takes - Die Hard was just starting on television when I sat down to install the deck and, I kid you not, I placed the final board into the body just as Bruce Willis was walking out of the building at the end of the move… so, one Niederbord Wagon’s deck = one viewing of Die Hard!)

Once the deck was installed, I was able to begin placing the interior wall veneers. This was rather straight forward using a few drops of CA and some clamps to affix the styrene strips to the inside of the body. I’ve only done the two end walls tonight - I will install the two side walls hopefully tomorrow after I do my last bits of painting to them. (Would have finished that tonight too, but ran out of painters tape midday and still have a little masking left to fishing on the walls.
Overall, I’m very happy with the veneers as I trimmed them slightly shorter than the LGB wall. Mounting them flush with the top of the body walls leaves a slight “gap” between them and the top of the wood deck. By doing this, it gives a nice impression that the walls are movable, rather than everything being just one, molded piece of plastic!


And that brings us up to current.
Sunday I hope to get the side walls finished (painted and installed), as well as install the platform decking. After that, there’s not much else to do. Once I’m 100% sure the body and the frame are ready to stay mounted, I’ll glue in the car-end stake pockets (which based on their locations glue across the two major assemblies) as well as installing a final pair of under-frame details (lever supports) that, again, glue across both the frame and the body.
Then, she should be ready to join the others in the engineering consist!
Parkdesigner
Registered
Hi Phil,
Not that hard to cut - the Basswood is soft enough that you can trim it with a sharpe Xacto.
As to accuracy, I cut the first board and sanded down its ends (cheap emery board sander stick) until it fit snugly in the box.
Then, I used it on my cutting mat as a guide to do the rest. I would cut just a hair longer than the original, and after I had 10-15 boards cut, I would stack them together, making sure one end of the stack had all boards flush, and then wrap them with some painters tape. This gives you the opposite end with a little variation in lengths across all the boards. I simply sand down till all are flush with each other. (Super simple if you have a smaller disk sander - but as I am working on SWMBO's dining table, and these are very much temporary trackage rights, I stick to hand tools! )
)
You are correct, a weak wash of flat black. I would likely go a tad darker (a few more drops of black) next time, but I wasn't ready to go back and re-wash everything on this build. The deviation in finishes is just how each strip of Basswood was manufactured. After I would cut down a particular strip (yield was 4 to 5 planks per strip), I would stain it, and mix it with others - trying to ensure there was a good jumble. As some strips washed darker than others, I wanted them to vary throughout the deck.
The Dullcote is a spray can - Testors #1260 Spray Lacquer. Matte finish. I was liberal in applying it to the planks, on both sides.
Overall, if I was building the model commercially, or for prolonged out-door running (and if we lived someplace where it rained more than a few days a year), I would likely choose a harder wood to make the deck from, but for my mainly indoor operations, the Basswood was the right balance of durability vs. cost.
Cheers,
Josh
Not that hard to cut - the Basswood is soft enough that you can trim it with a sharpe Xacto.
As to accuracy, I cut the first board and sanded down its ends (cheap emery board sander stick) until it fit snugly in the box.
Then, I used it on my cutting mat as a guide to do the rest. I would cut just a hair longer than the original, and after I had 10-15 boards cut, I would stack them together, making sure one end of the stack had all boards flush, and then wrap them with some painters tape. This gives you the opposite end with a little variation in lengths across all the boards. I simply sand down till all are flush with each other. (Super simple if you have a smaller disk sander - but as I am working on SWMBO's dining table, and these are very much temporary trackage rights, I stick to hand tools!
You are correct, a weak wash of flat black. I would likely go a tad darker (a few more drops of black) next time, but I wasn't ready to go back and re-wash everything on this build. The deviation in finishes is just how each strip of Basswood was manufactured. After I would cut down a particular strip (yield was 4 to 5 planks per strip), I would stain it, and mix it with others - trying to ensure there was a good jumble. As some strips washed darker than others, I wanted them to vary throughout the deck.
The Dullcote is a spray can - Testors #1260 Spray Lacquer. Matte finish. I was liberal in applying it to the planks, on both sides.
Overall, if I was building the model commercially, or for prolonged out-door running (and if we lived someplace where it rained more than a few days a year), I would likely choose a harder wood to make the deck from, but for my mainly indoor operations, the Basswood was the right balance of durability vs. cost.
Cheers,
Josh
Parkdesigner
Registered
Sunday morning and it was off to get some painters tape!
Once home, I wasted no time getting to it, tape it hand. First up, the last bits that needed to be masked on the car-side inner veneers.

And then outside to get a round of black primer, then a wash of Dullcote.
While I waited on that two-step process to dry, I turned my attention to finishing the platform decking.

As I waited for the wood glue to dry on the deck assembly, the veneers had dried enough to be glued into the car body.

And with that, it was just time to let everything dry for the afternoon!
Upon reflecting on the build (thus far) I realized that I forgot one important part… the platform steps! LOL.
LOL.
So, I need to add that to the punch list to finish the car, but to be honest, as of today I’ve reached a point where I’m happy to put the car up on the shelf and wait to find the perfect set of steps (spare part?) or fabricate them as I have time.
So for those keeping score at home, it’s important to note that my goal on this project was to “upgrade” and/or detail the car from LGB. Certainly there were things I cold have done in addition to the above efforts, but in weighing the added detail benefit vs. the additional time required, I feel this was just the right amount of effort to turn a rather non-accurate car into something that feels closer to a model than a “toy train.”
Once the final dullcote and glue was dry, I added the two small stake “pockets” on the non-platform car end. (These are just two bits of styrene square tube cut to size, sprayed the same color of grey as the frame, and glued over the LGB body molded “stakes.”) Then, I installed and glued down the platform deck on the frame.
Left to do:
Feeling rather accomplished I took her in to photograph with some of my other engineering/works stock:

As well as outside for some glamour shots in the late afternoon sun:


I suspect I’ll revive this thread in a few months time when I finally get the steps installed on this car (and the Xk 9089)! Until then, time to find another project!
Thanks all for following along.
Once home, I wasted no time getting to it, tape it hand. First up, the last bits that needed to be masked on the car-side inner veneers.

And then outside to get a round of black primer, then a wash of Dullcote.
While I waited on that two-step process to dry, I turned my attention to finishing the platform decking.

As I waited for the wood glue to dry on the deck assembly, the veneers had dried enough to be glued into the car body.

And with that, it was just time to let everything dry for the afternoon!
Upon reflecting on the build (thus far) I realized that I forgot one important part… the platform steps!
So, I need to add that to the punch list to finish the car, but to be honest, as of today I’ve reached a point where I’m happy to put the car up on the shelf and wait to find the perfect set of steps (spare part?) or fabricate them as I have time.
So for those keeping score at home, it’s important to note that my goal on this project was to “upgrade” and/or detail the car from LGB. Certainly there were things I cold have done in addition to the above efforts, but in weighing the added detail benefit vs. the additional time required, I feel this was just the right amount of effort to turn a rather non-accurate car into something that feels closer to a model than a “toy train.”
Once the final dullcote and glue was dry, I added the two small stake “pockets” on the non-platform car end. (These are just two bits of styrene square tube cut to size, sprayed the same color of grey as the frame, and glued over the LGB body molded “stakes.”) Then, I installed and glued down the platform deck on the frame.
Left to do:
- Install underframe lever and mounts (a pair of KISS spare parts in hand)
- Fabricate and install platform steps (need to research)
- Fabricate and install the side stakes and hardware (the stock LGB ones seem oversized and clunky)
- Letter and further weather the car sides
Feeling rather accomplished I took her in to photograph with some of my other engineering/works stock:

As well as outside for some glamour shots in the late afternoon sun:


I suspect I’ll revive this thread in a few months time when I finally get the steps installed on this car (and the Xk 9089)! Until then, time to find another project!
Thanks all for following along.
Parkdesigner
Registered
I suspect I’ll revive this thread in a few months time when I finally get the steps installed on this car
Well, February is more than a "few months" time, but excitingly we are back underway with finishing the build!
I sat down this weekend to get the steps fabricated. I looked and looked for the past half year on eBay, at model train shows, etc. for a set of steps that were accurate enough for the model, but no joy. Finally, this past Christmas, I was in Germany and picked up a jumble case of parts that were once a Pullman/ESU Fd wagon... and the steps out of it proved the starting point I needed.
First off I had to clean the glue residue from the step castings. Then I needed to fab a second set of steps, so out came the styrene and old mitre box!

Next was glue and clamp time.

With the correct number of steps now set, I needed to add a small flange on each set to help in mounting them to the car's underbody. So more glue, more clamps!

Now it's up to mother nature. The rain has been pretty relentless here the past few days - there is a chance of sunshine this coming week, before more rain next weekend. Hopefully, I'll get some primer and paint shot between storms this week, and can then install the steps and call the build "finished!"
Stay tuned, we should be done soon!
Parkdesigner
Registered
And here we are! A few hours of sunshine yesterday got the last of the paint and clear coat sprayed before today's thunderstorms rolled in.
I left everything to dry overnight, and then it was just a few drops of CA glue to secure the steps to the inside of the of car frame.

And there it is. The steps are slightly lighter in colour than I'd like, but some time this summer I'll give the car a wash of road weathering that should tone everything down.

For now though, it's back to the shelf.
(And on to the next car!)

I left everything to dry overnight, and then it was just a few drops of CA glue to secure the steps to the inside of the of car frame.

And there it is. The steps are slightly lighter in colour than I'd like, but some time this summer I'll give the car a wash of road weathering that should tone everything down.

For now though, it's back to the shelf.
(And on to the next car!)

Parkdesigner
Registered
Well what do you know, 3.5 years later, and it's time to revisit this thread!
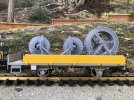
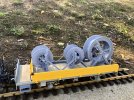
Been working on additional upgrades to some of the early maintenance cars I built. Thanks to a good friend with a 3D printer, I've finally got around to adding cable spools to Kk-w! Still needs a clean and paint/detailing - but I like where this is going.
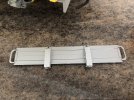
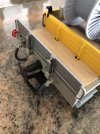
Additionally, I came up with a spare car-end from an LGB Re-w. I did a little clean up on the platform end of the car so that it would slide into the guides that were initially built from styrene. (The plan is to weather the whole thing once finished with the spools, so not supper bothered about the mis-matched paint at this point.)
Gotta say - I was pleased that my scratch build/bash on the car end was close enough to match the LGB produced parts!
You can see both here:


