Piko station printable station name template or stickers (found)

-bbbb

Registered
Country flag
EDIT: No longer needed, it can be found later in this thread.
--------------------------------------------------------------------------------
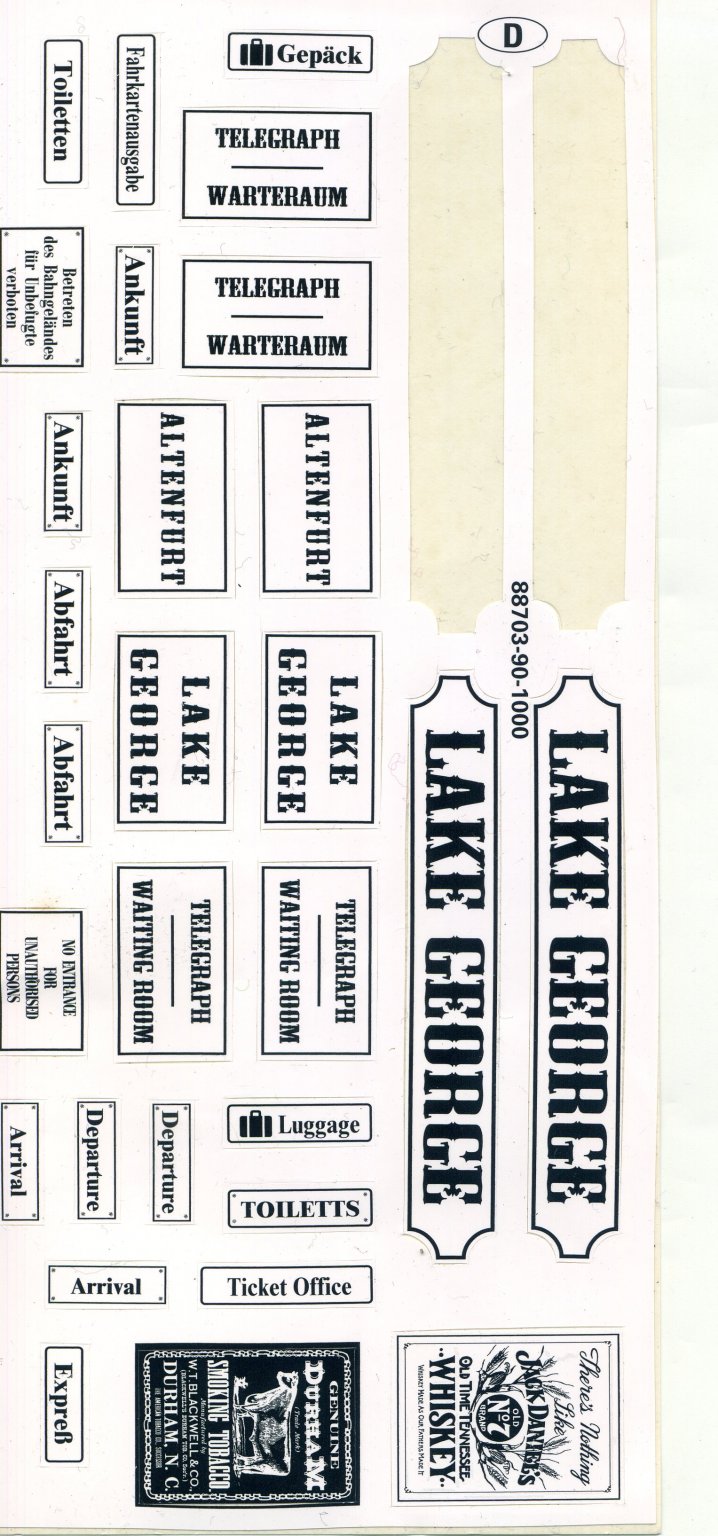
I'm missing some station name stickers for this Piko station:
piko2.JPGpiko1.JPG
Does anybody have a printable template for these kinds of signs? .. or maybe even extra stickers?
I'm missing two stickers of each kind of station sign(2 long ones and 2 small square ones)

Here's a few variants of what it's supposed to look like:
62700_1024x1024.png
62228_1024x1024.png

62709_1024x1024.png

62265_1024x1024.png


Thanks
 
Last edited:
This is basically the same building as the LGB Wild West station produced to go with the LGB Toy Train. I have one and I'll see if the stickers are still with it and get back to you.
 
Here's a scan of the sheet I have. Let me know if it's any use and I can either do a better scan or send you the original sheet.
 

Attachments

  • -bbbb001.jpg
    -bbbb001.jpg
    216.3 KB · Views: 0
Paul I was able to use one of the fonts you linked. Thank you.

Gordon, your scan worked very well. Good quality. I printed it at 80% of original size to fit well. It might have been slightly un-level, but I was able to manage by rotating the new text. 1% rotation was too much in either direction, so I rotated the first word one direction and the second word the other to give a balanced appearance on the larger sign.

This is intended to be temporary since it's not quite weather ready, but my kids think it's funny, so the weather proof version may be the same, but more neatly trimmed.
DSCF0296.JPG
 
Glad to be of service...
Looking good...
One thing I do when printing signs for outside use is too print out a A4 sheet of them on quality paper I then hot laminate it.
Obviously when the individual signs are cut out you have a raw paper edge, but a quick coat of spray matt lacquer sorts that out and reduces the shine.
Be aware that inkjet printed signs will fade after time if left in the sun, but what the hell, you've got plenty. Double sided tape seems to hold them in place OK, plus when you want to change them a little dab of metholated spirits cleans off the old tape residue a treat. I have been known to use the same process for temporary loco nameplates. It's a good way of checking they look right before spending out on brass ones. Check out 'Brooklyn', my little (LGB / Bachmann hybrid.) Porter kit-bash and the sign board on the rail-truck (LGB / Playmobil hybrid.)to see what they look like.
Regards.
Paul.
2020-11-11 002 005.JPG
 
Paul I was able to use one of the fonts you linked. Thank you.

Gordon, your scan worked very well. Good quality. I printed it at 80% of original size to fit well. It might have been slightly un-level, but I was able to manage by rotating the new text. 1% rotation was too much in either direction, so I rotated the first word one direction and the second word the other to give a balanced appearance on the larger sign.

This is intended to be temporary since it's not quite weather ready, but my kids think it's funny, so the weather proof version may be the same, but more neatly trimmed.
View attachment 276369
Glad to be able to help and thank you for the honour of having a station named after me.
 
Thanks...
It still needs a bit of finishing off, but that will have to wait until the move is all done with.
There's more info on the build hiding somewhere on the forum.
Paul.
I'll try and find that as I have been thinking of doing that with the same truck or motorising a Playmobil carriage as a tram.
 
I'll try and find that as I have been thinking of doing that with the same truck or motorising a Playmobil carriage as a tram.
If memory serves the rail truck was first mentioned in the thread 'After Shuttlegate a little relaxation.' though it does pop up in a couple of others,
attached are a couple of pics. Basically she she's a Playmobil 'Victorian' lorry bonnet, cab and rear bed fitted to a reversed, extended and cut around LGB Otto chassis with an extra section of Otto front chassis grafted to the end of the rear. (Which is now the front of the lorry.) The rear of the cab floor and a section of the rear bed floor were cut out to accept the motor block. The rear deb was raised to the level of the motor block to clear the wheels and allow a flat load space. Be aware, this bash does not allow for any of the original weights, so you need to fill the bonnet with lead and provide a suitably weighted load or it won't pull anything. As far as I know there was a van version of the lorry produced, but I never managed to get my hands on one, so settled for making the bed removable to allow for different rear bodies.
Hope this helps.
Paul
NB: the LGB / playtrain loco chassis are the same for the porter, Otto and diesel. Also the wheels are 30 mm. While the distance between the axles is pretty close to a Playmobil motor block, the larger wheels and protrusions made one of them less suitable.
 

Attachments

  • 2020-11-11 002 003.JPG
    2020-11-11 002 003.JPG
    317.6 KB · Views: 0
  • 2020-11-11 002 004.JPG
    2020-11-11 002 004.JPG
    304.2 KB · Views: 0
  • LGB - Playmobil hybrid rail truck (2).JPG
    LGB - Playmobil hybrid rail truck (2).JPG
    342.2 KB · Views: 0
  • LGB - Playmobil hybrid rail truck (7).JPG
    LGB - Playmobil hybrid rail truck (7).JPG
    442 KB · Views: 0
  • LGB - Playmobil hybrid rail truck (9).JPG
    LGB - Playmobil hybrid rail truck (9).JPG
    252.6 KB · Views: 0
Last edited:
If memory serves the rail truck was first mentioned in the thread 'After Shuttlegate a little relaxation.' though it does pop up in a couple of others,
attached are a couple of pics. Basically she she's a Playmobil 'Victorian' lorry bonnet, cab and rear bed fitted to a reversed, extended and cut around LGB Otto chassis with an extra section of Otto front chassis grafted to the end of the rear. (Which is now the front of the lorry.) The rear of the cab floor and a section of the rear bed floor were cut out to accept the motor block. The rear deb was raised to the level of the motor block to clear the wheels and allow a flat load space. Be aware, this bash does not allow for any of the original weights, so you need to fill the bonnet with lead and provide a suitably weighted load or it won't pull anything. As far as I know there was a van version of the lorry produced, but I never managed to get my hands on one, so settled for making the bed removable to allow for different rear bodies.
Hope this helps.
Paul
NB: the LGB / playtrain loco chassis are the same for the porter, Otto and diesel. Also the wheels are 30 mm. While the distance between the axles is pretty close to a Playmobil motor block, the larger wheels and protrusions made on of the less suitable.
Thanks, Paul, that's very useful and I shall follow up the link too.
 
Back
Top Bottom