A few years ago I posted some pictures of the Bachmann Climax I had purchased along with a set of six LGB log disconnects. I had spent some time painting the disconnects and someone on this forum asked about them at the time. In that same post I lamented not having another set to make up a longer train with the Climax.
I had been keeping my eyes pealed for another set at a reasonable price. A couple of weeks ago I bit the bullet and bought another set of six. They cost a bit more than I really wanted to spend but were in new condition. That and the fact that these are getting harder and harder to find triggered the purchase. In any case, here are some before and after pics.
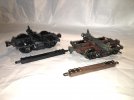
First up one of the new buggies on the left along with one from my first set.
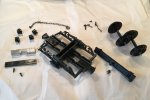
Next a picture of the disconnect taken apart for cleaning in preparation for painting. These come apart pretty easily. The only "secret" is that the journal boxes need to come off to remove the wheels. They are held in place by two tabs. The journal boxes come off by gently squeezing the tabs with a pair of needle nose pliers.
The log support can be taken off after the bottom cover of the bolster is removed. The buggies weight is also hidden in the bolster. I left the link and pin coupler boxes attached but did take the retaining chains and pins off.
I did not take any intermediate shots but here's what I did for painting. The longitudinal frame rails, bolsters, and bolster ends were painted using a fine brush and a medium brown lacquer paint. I was careful to keep the paint off the molded washer and bolt head details. The brown hue was mixed from two Humbrol colors I had on hand, a dark chocolate and a rust orange. This first coat was allowed to throughly dry for a couple of days. That kept the thinner used in the next step from removing any of the first coat of paint. I followed the first coat up with a wash of highly thinned "wood" color Model Master lacquer. This is a much lighter weathered wood color. Much of the thinned pigment settled in the "wood graining" highlighting it while the wash also lightened the overall color of the wood. The buggy frames were set aside to dry for another couple of days.
In the mean time three sets of four Bachmann 25.4 mm metal wheels arrived. I purchased these to replace the 31mm LGB plastic wheelsets. The original wheels looked oversized to my eye. After I had the wheels in hand I reassembled the disconnects.
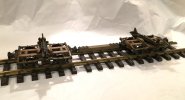
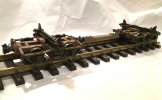
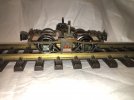
Next came a wash of very highly thinned rust orange color. This was carefully applied to the bolt head detail then rather liberally applied to the "metal" frame details and log support cross-member. The wash carried the thinned pigment into the nooks and crannies of the "metal" frame pieces. The wash also got rid of the plastic luster. After the rust had dried I did need to tone it down a bit in some spots. I easily accomplished this with a fine brush simply wetted with thinner. After seeing the following pictures, I may need to attack a few additional spots. Here are the mostly done results.
I had been keeping my eyes pealed for another set at a reasonable price. A couple of weeks ago I bit the bullet and bought another set of six. They cost a bit more than I really wanted to spend but were in new condition. That and the fact that these are getting harder and harder to find triggered the purchase. In any case, here are some before and after pics.
First up one of the new buggies on the left along with one from my first set.

Next a picture of the disconnect taken apart for cleaning in preparation for painting. These come apart pretty easily. The only "secret" is that the journal boxes need to come off to remove the wheels. They are held in place by two tabs. The journal boxes come off by gently squeezing the tabs with a pair of needle nose pliers.
The log support can be taken off after the bottom cover of the bolster is removed. The buggies weight is also hidden in the bolster. I left the link and pin coupler boxes attached but did take the retaining chains and pins off.

I did not take any intermediate shots but here's what I did for painting. The longitudinal frame rails, bolsters, and bolster ends were painted using a fine brush and a medium brown lacquer paint. I was careful to keep the paint off the molded washer and bolt head details. The brown hue was mixed from two Humbrol colors I had on hand, a dark chocolate and a rust orange. This first coat was allowed to throughly dry for a couple of days. That kept the thinner used in the next step from removing any of the first coat of paint. I followed the first coat up with a wash of highly thinned "wood" color Model Master lacquer. This is a much lighter weathered wood color. Much of the thinned pigment settled in the "wood graining" highlighting it while the wash also lightened the overall color of the wood. The buggy frames were set aside to dry for another couple of days.
In the mean time three sets of four Bachmann 25.4 mm metal wheels arrived. I purchased these to replace the 31mm LGB plastic wheelsets. The original wheels looked oversized to my eye. After I had the wheels in hand I reassembled the disconnects.
Next came a wash of very highly thinned rust orange color. This was carefully applied to the bolt head detail then rather liberally applied to the "metal" frame details and log support cross-member. The wash carried the thinned pigment into the nooks and crannies of the "metal" frame pieces. The wash also got rid of the plastic luster. After the rust had dried I did need to tone it down a bit in some spots. I easily accomplished this with a fine brush simply wetted with thinner. After seeing the following pictures, I may need to attack a few additional spots. Here are the mostly done results.


Last edited:
