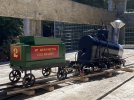
Mt. Washington Ammonoosuc model build

Arlo's Trains

Registered
Country flag
Hi!

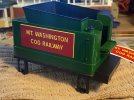
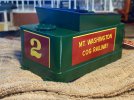
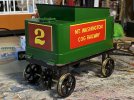
Thanks again for the warm welcome! Here’s a current project I’m working on, a fully operational electric powered 1/2” scale gauge 3 model of the Mt Washington Cog’s #2 “Ammonoosuc”

Tender tank is all plastruct 2mm styrene and coal wall is 1mm ABS sheet, 3D printed ABS corners and water filler caps. Painted with Tamiya “Racing Green” and decals are from Del at G Scale Graphics. Deck is wood and frame is all brass.

Once the tender is done(which isn’t long at all now) I’ll be starting in the loco.
 

Attachments

  • 95982DA5-9AB1-4958-B655-2AE7C6165B22.jpeg
    95982DA5-9AB1-4958-B655-2AE7C6165B22.jpeg
    526.5 KB · Views: 0
  • B55AE894-1A1F-4AFC-902B-80ED275430BF.jpeg
    B55AE894-1A1F-4AFC-902B-80ED275430BF.jpeg
    451.4 KB · Views: 0
  • A6D98CCD-17A5-4670-9DB6-3FC06FCEFD06.jpeg
    A6D98CCD-17A5-4670-9DB6-3FC06FCEFD06.jpeg
    746.7 KB · Views: 0
Very good. I have fond memories of that railway, part of a wonderful holiday in New England some years ago. At the bottom, sometime in early October, it was a beautiful sunny morning. By the time we reached the top we were in a winter wonderland in a foot of snow and biting winds. It's the first time I have seen horizontal icicles. The people who boarded the train in flip-flops and shorts weren't as amused as I was. The view from the top was tremendous.

EDIT: so as not to hi-jack the thread I have added some pictures of my visit here https://www.gscalecentral.net/search/47720/?q=mount+washington&t=xfmg_media&o=date
 
Last edited:
Yep that weather sounds about right for Mt Washington :tonguewink: Lovely pictures too
Very good. I have fond memories of that railway, part of a wonderful holiday in New England some years ago. At the bottom, sometime in early October, it was a beautiful sunny morning. By the time we reached the top we were in a winter wonderland in a foot of snow and biting winds. It's the first time I have seen horizontal icicles. The people who boarded the train in flip-flops and shorts weren't as amused as I was. The view from the top was tremendous.

EDIT: so as not to hi-jack the thread I have added some pictures of my visit here https://www.gscalecentral.net/search/47720/?q=mount+washington&t=xfmg_media&o=date
 
Yes, the pictures are great!
 
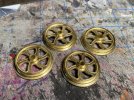
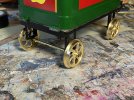
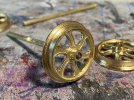
Tender wheels came from shapeways today, and very pleased with them. Don’t even need machining as they are near perfectly round with less then a thousandth of an inch runout which is more then fine.

Need to cut longer axles as I accidentally made the first pair too short, but did a test with my insulation technique. Just paint for these and the tender is done.

3BA86FF4-CB8D-42CE-A1B3-930B75E8E31D.jpeg

AE906402-FA37-4F62-A3D7-EC6B70C416B5.jpeg
DE4693A6-1805-4936-8050-C1C0E372D8CB.jpeg
 
Tender wheels came from shapeways today, and very pleased with them.
Arlo,
Could you tell a little more about these please? - I think of Shapeways as supplying 3D printed parts?

Are these brass castings, or something more 'exotic' 3D printed?

Thanks,
PhilP.
 
Arlo,
Could you tell a little more about these please? - I think of Shapeways as supplying 3D printed parts?

Are these brass castings, or something more 'exotic' 3D printed?

Thanks,
PhilP.
Hi

Basically these are lost wax cast, so the wheels are 3D printed in a wax infused resin on a SLA printer, cast in plaster, wax melted out and molten brass poured in.

So yeah they are brass castings
 
Hi

Basically these are lost wax cast, so the wheels are 3D printed in a wax infused resin on a SLA printer, cast in plaster, wax melted out and molten brass poured in.

So yeah they are brass castings
Clever!

I will have to explore this, as a low-volume method of getting parts.

Thank you for the explanation. :)
 
Hi

Basically these are lost wax cast, so the wheels are 3D printed in a wax infused resin on a SLA printer, cast in plaster, wax melted out and molten brass poured in.

So yeah they are brass castings
One very important point about using plaster for casting is to ensure that the plaster is fully dry before pouring molten metal in the mould. The plaster can and will explode with the slightest dampness remaining. Likely melting out the wax should resolve the issue but I would still want to put the plaster in an airing cupboard or very sunny window for a week or so before using.
 
I have done lost-wax casting of jewellery findings, in the past..

I don't have the facilities now, but knowing that Shapeways can do this, is a useful nugget to file-away..
 
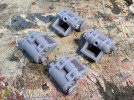
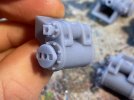
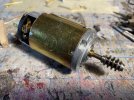
Haven’t added to this in a while due to nothing to show, but now I sort of do. Tender is officially complete now and I had a friend print me the cylinders on his high detail resin printer. (First locomotive parts!) Also purchased a motor for the loco.

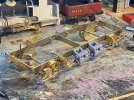
I’m still waiting on the laser cut brass frames that have gotten a bit delayed due to unrelated issues at Ponoko’s end but they should be here next week and cast brass cranks & wheels by New Years from shapeways.

All going to plan a motorized locomotive chassis will be done and rolling by mid January.
 

Attachments

  • E3EDDD8D-8349-4506-BC16-6C725839A52F.jpeg
    E3EDDD8D-8349-4506-BC16-6C725839A52F.jpeg
    527.7 KB · Views: 0
  • C33CEE5C-9BDF-49BD-98BE-555D52D839B1.jpeg
    C33CEE5C-9BDF-49BD-98BE-555D52D839B1.jpeg
    852.3 KB · Views: 0
  • CA9DEC9C-706D-421F-9584-490DAB20B625.jpeg
    CA9DEC9C-706D-421F-9584-490DAB20B625.jpeg
    376.5 KB · Views: 0
  • F8FDE8FC-B987-47F3-B7FD-94CDDA6156F1.jpeg
    F8FDE8FC-B987-47F3-B7FD-94CDDA6156F1.jpeg
    599 KB · Views: 0
Well thought it was time to update this as some rather significant progress has been made on Ammonoosuc;

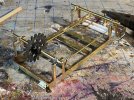
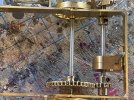
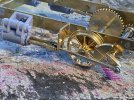
The laser cut brass frames arrived a couple weeks ago and shortly after the brass parts from Shapeways so I’ve been busy. The frames where soldered together with Stay Brite Silver solder and flux, which due to tab and slots holding everything in alignment was exceptionally easy. Flycranks where tapped and are held quartered via a groove filed in the axle and everything on the axles except the wheels for electrical insulation purposes is held in place with set screws for easy disassembly/reassembly.

With the running gear basically complete (minus cog wheels) and running smooth as silk I’ll be getting the boiler made and installed soon, then it’ll really start to look like a locomotive3D83BD7C-0749-4575-9F8E-81C30A03F21F.jpegA9C75969-D609-42F2-99EB-7C24FE3FAA2C.jpegBC111773-5020-4C3F-BAE1-5E0248D2690F.jpeg
 
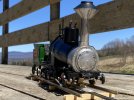
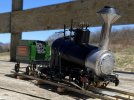
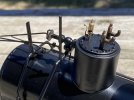
Well it’s certainly been a minute, but I’ve been making steady progress on Ammonoosuc. She is now a completely functional locomotive as the boiler has been made, detailed, painted and fitted to the also now painted frames and motion. All that remains now is the Cab and footboard’s basically which I’ll be starting on soon. 433BEF18-8EA2-483B-A946-E7A0BEBCDB8A.jpegAA064D52-8FF3-436B-92CB-8B0E40F97C8D.jpegC2076E33-199D-4D18-8194-DC38E42CE073.jpeg3D8A1CF1-B7BE-4459-AE3D-9EB1A0C9EA7C.jpeg
 
Back
Top Bottom