LGB wheel tyre removal

Paul2727

Registered
Country flag
Hi all,
Has anyone ever successfully removed the metal tyres from the plastic centres of LGB wheels? Either the Push or screw on type.
I assume they are held by some kind of adhesive or possibly the plastic is moulded in situ.
Reason:
I'd like to see if it's feasible to swap worn out tyres with good ones and also fit / remove tyres with traction tyre grooves.
Regards,
Paul.
 
Never even thought of trying it, I guess it would all end in tears. Not even sure if the metal tyres would be available. Swopping wheels is less of a task on the older screw fit types if you can get replacements. Think the newer press on come as a pair?

Swopping for additional traction tyres can on smaller locomotives make running erratic due to power pickup loss, I even would prefer no traction tyres as they tend to make us work our little locs work too hard potentially causing gear breakages and excessive wear.
 
I have not tried to take a tyre off an LGB wheel..

Perceived wisdom is to swap the wheel. :nerd:
 
Not even sure if the metal tyres would be available. Swopping wheels is less of a task on the older screw fit types if you can get replacements. Think the newer press on come as a pair?

Thank you.
Yes the push on types do come as a wheelset (2 x wheels and an axle.) Although the wheel wheels come off easily with the correct support and drift as they only have about 2.5 mm of splines. The trick to replacing them is marking the position of the connecting rod screw hole on the axle before removal.
The bolt on ones are simple to swap using the same trick to make sure they are in the right place.
However the reason I'm interested in swapping tyres is that I have amassed quite a cache of wheels with damaged / utterly worn out tyres but good centres and a fair few wheels with almost perfect tyres but with broken off coupling rod lugs or broken out centres.
With the cost of replacement wheels / wheelsets becoming more than I can afford. (If they are still available.) I thought I's see what could done with otherwise scrap parts.
Maybe this will be a first, I just wondered if anyone has tried it. Even details of abject failures would be helpful as the plastic innner wheel appears too be stepped.
Regards,
Paul.
 
In which case.. Go for it!

i would take a wheel with a trashed centre, and remove the centre. - Possibly, a big drill, then pliers to lever the remains out?
You should then (hopefully) have a good tyre, and an reasonable idea about the inner-profile, and how they are secured (if more than friction).

Will be interesting to see your results.. :wondering::think:
 
You will trash the centre if you try to remove it . there is a groove around the inside centre of the tyre i believe the centre of the wheel is moulded to the tyre. not the tyre fitted to the wheel.
 
You will trash the centre if you try to remove it . there is a groove around the inside centre of the tyre i believe the centre of the wheel is moulded to the tyre. not the tyre fitted to the wheel.
That was pretty much my view, that somehow the inside would be trashed. However in an all or to hell with it on a trashed wheel. Put it on a good strong vice, flange down with the jaws open so that the middle plastic may drop through if released. Then you need something to act as a drift that will be as close as possible to the max size of the plastic. Take a deep breath, pray and wallop with a suitable large sized hammer. Let us know what happens with a picture of the trashed remains please?

Remember trashed wheel for this first experiment
 
Why not just purchase a complete replacement wheel, and be done with it...better to purchase them in pairs, so they match. LGB does offer them, as far as I know; for most of their locomotives.
 
Why not just purchase a complete replacement wheel, and be done with it...better to purchase them in pairs, so they match. LGB does offer them, as far as I know; for most of their locomotives.
Paul noted in post #4 that cost was an issue.
 
So Paul, it's be a couple of days, did you punch the center out on one wheel and see what the inside of the "tyre" looks like?

If there is an inside groove, then even if you can remove a tyre without damaging the plastic (cutting tyre off with a dremel and spreading it) and then getting the "new" tyre by punching out the center of another... you may still not be able to re-assemble.

please do the experiments and show us what can be done, perhaps some brilliant idea will surface.

Greg
 
The metal rim is grooved on LGB metal wheels for cars (rolling stock). I assume they inject the plastic into the rims.
 
I bought one axle with two spoked wheels on it, at a sale and one of the plastic spoked rims was broke. So I decided to keep the metal tires and remove the spoked rims. They were very hard to get out, had to break it into pieces. So from my experience it is not possible to get the tire off without breaking the rim.
 
So Paul, it's be a couple of days, did you punch the center out on one wheel and see what the inside of the "tyre" looks like?

If there is an inside groove, then even if you can remove a tyre without damaging the plastic (cutting tyre off with a dremel and spreading it) and then getting the "new" tyre by punching out the center of another... you may still not be able to re-assemble.

please do the experiments and show us what can be done, perhaps some brilliant idea will surface.

Greg

Hello all.
Well it seem that everyone was almost right.
It transpires that while it is possible to split a push on type LGB wheel in half without causing major damage to the inner plastic it requires a very steady hand or a lathe. (which I don't have.) And not a little luck.

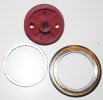
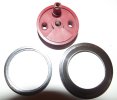
Firstly, there is indeed a raised ridge in the plastic (2 mm wide & 3.5 mm in from the rear of the flange.)
I cut the tyre around its circumference after making an educated guess as to where the ridge would be.

I wasn't far off, maybe 0.5 mm too close the rear of the flange. The rear section of the tyre popped straight off.
However the front section of the tyre also needed to come off towards the rear, necessitating the removal of the ridge.
If I'd used a lathe, it would probably be possible to remove it cleanly.

With the ridge removed, It should then be possible to fit a replacement tyre. (from the rear.) With the rebate in the tyre filled with adhesive.
There are also splines cast into the tyre, obviously to stop any rotation. The plastic was definitely moulded in situ.

This was a wheel with serious tyre wear, so much in fact that I initially thought it had a worn traction tyre groove, but no, the tyre was just totally concave due to excessive wear.

Please find photos attached.

The next step is to remove the plastic from a wheel with a wrecked centre and a good tyre to see if after a bit more cleaning up of the ex ridge, the two will fit together flush and level. If not, at least I'll have some interesting pieces for a scrap load.

All in all, an interesting experiment, but how durable a wheel rebuilt in this manner would be is anyone's guess.

Regards,
Paul.
 

Attachments

  • stainz wheel disassembled rear.JPG
    stainz wheel disassembled rear.JPG
    190.9 KB · Views: 0
  • stainz wheel disassembled front.JPG
    stainz wheel disassembled front.JPG
    210.2 KB · Views: 0
Last edited:
Interesting but sorry I am a little confused, where does the metal on the left of your pic come from? You may have said itbin your narrative but the words did not register to me.
 
"I cut the tyre around its circumference after making an educated guess as to where the ridge would be. "
Ah the penny dropped (I think) so that is the silver bit on the front of the wheel that is such a pain to keep dirty when weathered?
 
Ah the penny dropped (I think) so that is the silver bit on the front of the wheel that is such a pain to keep dirty when weathered?

Sorry if I didn't make it clearer.
Yes the thin silver ring is the front half of the tyre. In Pic 2 (front view) you can see the rebate that the front of the plastic hub sits in, it also shows the splines / serrations that stop the tyre rotating on the hub id the adhesion between the two fails.
Unfortunately it appears that I photographed the remains with the rear half of the tyre. Complete with the flange the wrong way round in both pictures. The brass coloured thick ring is the front of the rear section of the tyre and the blackened one in pic 2 is the rear of the flange showing the deposits left by the carbon brushes. Both sections of the tyre had to be removed by pushing them to the rear of the hub. after the offending ridge on the hub has been removed.
In essence I turned into a split rim wheel.
This explains why the hub is destroyed if removed by a punch or press as it overlaps the tyre on the front and the ridge stops both backward and forward movement.
Neither part of the tyre is usable after removal by this method, but the hub is recovered intact.

Part two will be to remove a damaged hub from a wheel with a good tyre and see if they can be made to fit together to form one good wheel.

Hope this clears things up a bit.
Regards,
Paul.
 
Last edited:
Sorry if I didn't make it clearer.
Yes the thin silver ring is the front half of the tyre. In Pic 2 (front view) you can see the rebate that the front of the plastic hub sits in, it also shows the splines / serrations that stop the tyre rotating on the hub id the adhesion between the two fails.
Unfortunately it appears that I photographed the remains with the rear half of the tyre. Complete with the flange the wrong way round in both pictures. The brass coloured thick ring is the front of the rear section of the tyre and the blackened one in pic 2 is the rear of the flange showing the deposits left by the carbon brushes. Both sections of the tyre had to be removed by pushing them to the rear of the hub. after the offending ridge on the hub has been removed.
In essence I turned into a split rim wheel.
This explains why the hub is destroyed if removed by a punch or press as it overlaps the tyre on the front and the ridge stops both backward and forward movement.
Neither part of the tyre is usable after removal by this method, but the hub is recovered intact.

Part two will be to remove a damaged hub from a wheel with a good tyre and see if they can be made to fit together to form one good wheel.

Hope this clears things up a bit.
Regards,
Paul.
Many thanks Paul, I think it was mostly a tired me trying to understand things at 0500ish in the morning. Good luck with the next part.
 
Back
Top Bottom