Distrackted
Registered
Following is a description of how I added sound to my LGB 27410 RhB Tractor locomotive. It also describes a good temporary repair to the tambour (roll-up doors) that were cracked and separated, as is common to many of these locomotives. When completed, I found if to be running jerkily and managed to diagnose a split gear on one of the axles, which was easily replaced with a new one from AllAboutLGB (Product number: 88330049).
This locomotive was already MTS digital with a small LGB onboard decoder. I added a Massoth S decoder with the 822X041 sound project "RhB Traktor Tm2/2 16". I used a CUI Audio miniature rectangular loud speaker (CUI 14028, 8 ohm 2 watt). I built a speaker enclosure from 1/4" ABS sheet and mounted it to the floor of the cargo compartment (4 small screws from underneath). I used some perforated steel from an old computer power supply to protect the upward facing speaker and to add a bit of an industrial look to the "cargo". I soldered a JST connector to the track power leads on the motor block plug. This was to allow the body to be separated from the frame as needed. The mating part of the connector was connected to the sound board through a miniature toggle switch mounted in the cab. This allows the power to the sound board to be turned off if required for silence, or if needed for programming purposes. The onboard decoder can similarly be disabled by the factory installed multi-position switch also in the cab.
The tambour doors were both cracked and separated in 2 or 3 places. I found that using aluminum foil HVAC tape on the back of the doors does an excellent cosmetic and functional job of holding the parts together. It adheres very well and can be rubbed for a very tight contact. I hope to try 3d printing replacement doors in flexible TPU one of these days, but this temporary fix is just fine for now.
There are only six screws holding the body on to the frame, all easily accessible: To remove the body, the front of the frame must be lowered first and then the frame slid back a bit to allow the back to drop down clear of the mounting lugs. Be careful to turn the frame a bit so that the drivers arm does not get broken as it is being removed. Once the two parts are separated, the cargo compartment floor can easily be removed by carefully bending the rear wall back a bit.
Re-assembly is the reverse. The back must be hooked in first and the front last.
Overall , this is a very easy project.
Pictures below:
Here is the finished item:

This is the speaker that was used. The sound seems about right for this small locomotive:

This is the back of the speaker with the item number:

And here is the ABS speaker enclosure all glued together with gel cyanoacrylate glue:

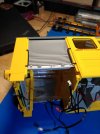
With an industrial looking protective grill added:

Here is a picture of the sound decoder toggle switch inside the cab:

And the toggle switch from below:

This picture shows where the sound decoder is located. Up inside the body shell adhered with double faced adhesive mounting tape:

Here is the JST connector soldered to the motor block plug:

And everything plugged back in:

This is a diagram of the small onboard decoder showing the connections:

Another view of the finished locomotive:
To repair the tambour doors. First carefully align and tape everything together from the fron:

Then put a layer of the foil tape on one side of the back:

Put a second strip off to the other side of the back and rub quite hard over the surface for maximum contact:

Then remove the tape from the front and trim off any overhanging tape if necessary:
This locomotive was already MTS digital with a small LGB onboard decoder. I added a Massoth S decoder with the 822X041 sound project "RhB Traktor Tm2/2 16". I used a CUI Audio miniature rectangular loud speaker (CUI 14028, 8 ohm 2 watt). I built a speaker enclosure from 1/4" ABS sheet and mounted it to the floor of the cargo compartment (4 small screws from underneath). I used some perforated steel from an old computer power supply to protect the upward facing speaker and to add a bit of an industrial look to the "cargo". I soldered a JST connector to the track power leads on the motor block plug. This was to allow the body to be separated from the frame as needed. The mating part of the connector was connected to the sound board through a miniature toggle switch mounted in the cab. This allows the power to the sound board to be turned off if required for silence, or if needed for programming purposes. The onboard decoder can similarly be disabled by the factory installed multi-position switch also in the cab.
The tambour doors were both cracked and separated in 2 or 3 places. I found that using aluminum foil HVAC tape on the back of the doors does an excellent cosmetic and functional job of holding the parts together. It adheres very well and can be rubbed for a very tight contact. I hope to try 3d printing replacement doors in flexible TPU one of these days, but this temporary fix is just fine for now.
There are only six screws holding the body on to the frame, all easily accessible: To remove the body, the front of the frame must be lowered first and then the frame slid back a bit to allow the back to drop down clear of the mounting lugs. Be careful to turn the frame a bit so that the drivers arm does not get broken as it is being removed. Once the two parts are separated, the cargo compartment floor can easily be removed by carefully bending the rear wall back a bit.
Re-assembly is the reverse. The back must be hooked in first and the front last.
Overall , this is a very easy project.
Pictures below:
Here is the finished item:
This is the speaker that was used. The sound seems about right for this small locomotive:
This is the back of the speaker with the item number:
And here is the ABS speaker enclosure all glued together with gel cyanoacrylate glue:
With an industrial looking protective grill added:
Here is a picture of the sound decoder toggle switch inside the cab:
And the toggle switch from below:
This picture shows where the sound decoder is located. Up inside the body shell adhered with double faced adhesive mounting tape:
Here is the JST connector soldered to the motor block plug:
And everything plugged back in:
This is a diagram of the small onboard decoder showing the connections:
Another view of the finished locomotive:
To repair the tambour doors. First carefully align and tape everything together from the fron:
Then put a layer of the foil tape on one side of the back:
Put a second strip off to the other side of the back and rub quite hard over the surface for maximum contact:
Then remove the tape from the front
and trim off any overhanging tape if necessary: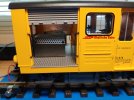
") I'm very interested in the how and result of your coming 3D printing project for this flexible door.
I'm very interested in the how and result of your coming 3D printing project for this flexible door.


