Fowler Diesel

Andreas

Registered
26 Jan 2021
95
27
57
79576 Weil am Rhein, Germany
Country
Germany
fam-weniger.jimdofree.com
Best answers
0
Country flag
Hello together,
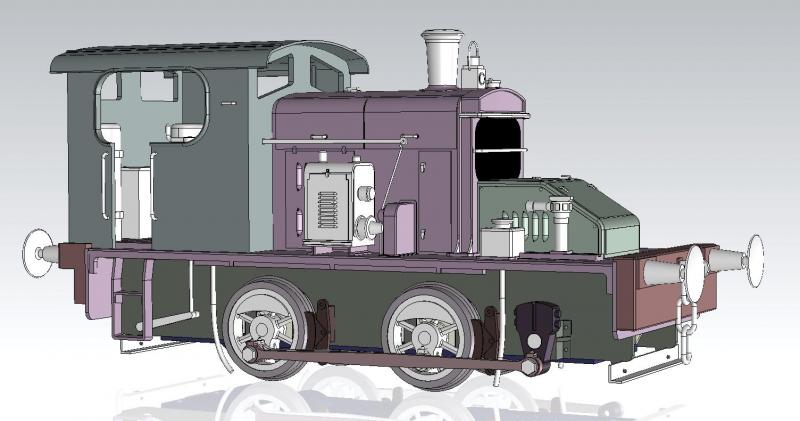
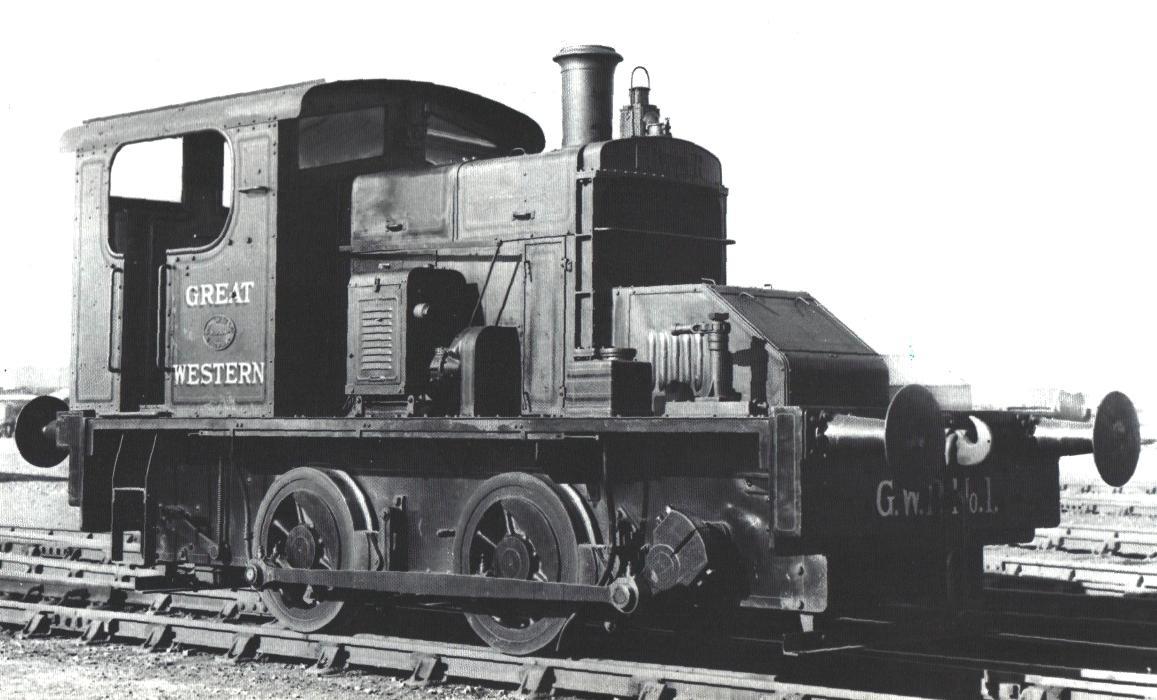
I am once again planning... . And have questions.I have found a LGB drive in my hobby box - I have to do something with it. It would fit quite well for a small diesel loco. So I want to build maybe a small Fowler 0-4-0. Not scale rather again after feeling... Here are two pictures from click.
- What are those 2 power units mounted on the side?
- Does anyone have interior pictures of the cab?

Thanks in advance
Andreas
 

Attachments

  • post-13142-0-58894000-1362246413.jpg
    post-13142-0-58894000-1362246413.jpg
    95.6 KB · Views: 0
  • post-13142-0-54602400-1362246411_thumb.jpg
    post-13142-0-54602400-1362246411_thumb.jpg
    44.4 KB · Views: 0

PhilP

G Scale, 7/8th's, Electronics
5 Jun 2013
33,561
3,521
Nottingham
Best answers
0
Country flag
The bigger unit is a 'donkey engine' which were used to help start bigger diesel engines.

I think the smaller rectangular boxes, towards the front on both sides, were sand-boxes?
 

ge_rik

British narrow gauge (esp. Southwold and W&LLR)
24 Oct 2009
10,701
1,244
Cheshire
www.riksrailway.blogspot.com
Best answers
0
Country flag
  • Like
Reactions: 1 users

Andreas

Registered
26 Jan 2021
95
27
57
79576 Weil am Rhein, Germany
Country
Germany
fam-weniger.jimdofree.com
Best answers
0
Country flag

Andreas

Registered
26 Jan 2021
95
27
57
79576 Weil am Rhein, Germany
Country
Germany
fam-weniger.jimdofree.com
Best answers
0
Country flag
Hello all,
it goes on - slowly.... The locomotive is assembled, the eccentrics and the rodding are built. I have attached dummies of the brakes. The substructure in the rear is a bit larger, the speed controller and sound module will be installed here. Accus and receiver should be in the engine compartment.
I have ordered the electronics from Fosworks - let's see how long it takes to ship them to Germany.
IMG_20220123_170338.jpgIMG_20220123_170346.jpgIMG_20220123_170356.jpgIMG_20220123_170404.jpgIMG_20220123_170412.jpgIMG_20220123_170421.jpg
 

Andreas

Registered
26 Jan 2021
95
27
57
79576 Weil am Rhein, Germany
Country
Germany
fam-weniger.jimdofree.com
Best answers
0
Country flag
Hello together,
So now the Loco is ready.... The locomotive is controlled with RC control from Fosworks. The sound module is from MyLocosound. The batteries are Lithium Ion batteries with 7,4V and 6800 mA. The loudspeaker is installed under the cabin roof. The locomotive looks well used. The right driver is still missing.
The name is like my other locomotives again a mountain in Co Clare.
IMG_20220204_181829.jpgIMG_20220204_181834.jpgIMG_20220204_182051.jpgIMG_20220204_181927.jpgIMG_20220204_182116.jpgIMG_20220204_181950.jpgIMG_20220204_182345.jpgIMG_20220204_181904.jpg
 
  • Like
Reactions: 1 user

Moonraker

Registered
25 Oct 2009
1,104
131
South Australia
Best answers
0
Country flag
Hello together,
So now the Loco is ready.... The locomotive is controlled with RC control from Fosworks. The sound module is from MyLocosound. The batteries are Lithium Ion batteries with 7,4V and 6800 mA. The loudspeaker is installed under the cabin roof. The locomotive looks well used. The right driver is still missing.
The name is like my other locomotives again a mountain in Co Clare.
View attachment 295025View attachment 295026View attachment 295030View attachment 295028View attachment 295031View attachment 295029View attachment 295032View attachment 295027
What a great model. The weathering really captures the look of a well used locomotive. How do you do the rivets?

Regards
Peter Lucas
MyLocoSound
 

Andreas

Registered
26 Jan 2021
95
27
57
79576 Weil am Rhein, Germany
Country
Germany
fam-weniger.jimdofree.com
Best answers
0
Country flag
What a great model. The weathering really captures the look of a well used locomotive. How do you do the rivets?

Regards
Peter Lucas
MyLocoSound
Hi Lucas,
the rivets were created in two ways.The rivets on the body were simply created with the parts on the 3D printer. So nothing special.
The row of rivets on the chassis I made with wood glue. I use "Ponal waterproof". With a toothpick I put a small drop as a rivet. If it dries too flat, I put another dab of glue on it. That's it. There are also templates for the glue method in model aircraft construction.
 

Moonraker

Registered
25 Oct 2009
1,104
131
South Australia
Best answers
0
Country flag
Hi Lucas,
the rivets were created in two ways.The rivets on the body were simply created with the parts on the 3D printer. So nothing special.
The row of rivets on the chassis I made with wood glue. I use "Ponal waterproof". With a toothpick I put a small drop as a rivet. If it dries too flat, I put another dab of glue on it. That's it. There are also templates for the glue method in model aircraft construction.
Nice rivet idea. Thanks

Peter Lucas
MyLocoSound