Coal loads and gravel loads.....

Zerogee

Clencher's Bogleman
25 Oct 2009
17,351
1,723
North Essex
Best answers
0
Country flag
Following my recent thread (in Electric Locos) about filling the coal bunker on my new Pfiffi, a few days ago I had a couple of hours spare - a rare thing at the moment - and decided to try out the technique in a rather larger way, with the wagon loads I'd been planning to do for ages. I know a lot of people have used this method, but as I actually remembered to take some photos for once I thought I'd document it here for general interest.....

I decided to do a batch of coal wagon loads (4 of them to fit standard LGB high-sided open wagons) and the first few Gravel loads for the Silberhutte hopper cars - I eventually need to make about a dozen of these, but I just did three for the first trial run.

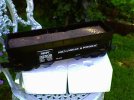
First job is to cut and shape a suitable block of foam to fit the wagon - snugly enough that the coal/gravel doesn't all fall down the sides of the foam, but not so tight that it's difficult to get in and out of the wagon body. I'd recently bought a rather nice foam cutter (mains-operated) from a chap on eBay who makes them himself, cost me around thirty quid or so, and it proved to be a very good investment - it made the cutting of the basic blocks a doddle, and the shaping of the tops of the blocks was very easy too - just holding the block and maneuvering it freehand while the cutter held the wire solidly. You can see a pile of the "shavings" in a few of the pics!

The tabletop foam cutter:

Foam cutter2.jpeg

And the cutter with a shaped foam block ready for one of the gravel hopper cars:

Foam cutter.jpeg

The orange foam is the stuff sold in packs of four or five large (about 4' x 2') sheets for loft insulation, it's about 2" thick and perfect for this - but of course you can also use any "free" bits of foam packing that you happen to have around.....

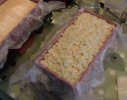
After doing all the blocks, the wagons are then lined with a double thickness of cling-film (some particularly heavy-duty stuff raided from the kitchen cupboard) and the foam block placed in them - at this point the Memsahib commented that it looked like I was baking some loaves....

Gravel wagon foam.jpeg

And the same for the coal wagons......

Coal wagon foam.jpeg

I don't know if it's very clear from the pics, but when I freehand-carved the tops of the foam blocks with the hot wire, the gravel wagon ones are "single-hump" while the longer coal loads are "double-humped", to give the appearance that they have been loaded in two piles - the finished effect is very realistic I think!

Now the filling is mixed - a 50/50 dilution of white PVA glue (from the kids' craft section of Tesco...) with a potful of the Dunelm "vase filler" dumped in and vigorously stirred around. The nice plastic bucket originaly held over a kilo of Maoam chewy sweets, it was a terrible effort to consume them all so that i could use the bucket.... :rofl:

Gravel mix.jpeg

Right, I'd better stop this post here and upload it, before it gets too big and the forum loses it.....

More to follow!

Jon.
 

Zerogee

Clencher's Bogleman
25 Oct 2009
17,351
1,723
North Essex
Best answers
0
Country flag
OK, part 2.......

The resulting disgusting-looking mix was liberally dolloped into the cars on top of the foam blocks, and poggled around with a coffee stirrer until it was a reasonable thickness - enough to cover the orange foam, but not so much that the PVA wound never dry. A pic of one of the gravel wagons being done, note that here the application isn't quite deep enough yet as some of the orange foam is still visible - more gravel to be added!:

Gravel wet2.jpg

After all the wagons are filled to a suitable depth, they were put in the (very warm!) conservatory for several days to dry..... here are the coal-load ones, done in exactly the same way as the gravel hoppers, but note the two-humped load shape..... this is after a day or so, and the white PVA has all turned clear on the top surface - but beware, underneath there was still a LOT of very liquid glue, so don't be tempted to rush the drying time!

Coal wagons drying.jpeg

After I was sure that the actual load parts were pretty much solid, I VERY carefully lifted the complete blocks out of the wagons (the opening doors on the LGB opens were rather useful here!) and peeled away the clingfilm wrap - this is a messy process as there was still quite a lot of liquid PVA mix that had run down and collected under the foam blocks (and was never going to fully dry, because it was sealed off from the air), fortunately the clingfilm prevented any of it getting onto the trucks themselves and I was able to wipe away the excess with a lot of paper towels.... it all dries clear anyway, so you don't need to worry about removing every last trace.

So, after about a week or drying in total, here's the end results.... I'm very happy with how they've turned out, the finished blocks are very easily removable from the wagons, they are quite lightweight so won't be too much of a load for the loco, and I think they really look the part!

Gravel wagons1.jpeg

Gravel wagons2.jpeg

Coal wagons1.jpeg

Coal wagons2.jpeg

Coal wagons3.jpeg

Jon.
 

Attachments

  • Gravel wet2.jpg
    Gravel wet2.jpg
    154.3 KB · Views: 0
  • Like
Reactions: 6 users

Madman

Registered
25 Oct 2009
17,143
2,958
Pennsylvania, USA
Best answers
0
Country flag
Great work.
 

trammayo

Interested in vintage commercial vehicle, trams, t
24 Oct 2009
22,671
4,680
75
Co. Mayo
Country
Ireland
Best answers
0
Country flag
I never thought of using the insulation foam - I have some cavity insulation left (just have to remove the foil on one side) - it is far less friable than the scrap polystyrene I have used in the past. Great idea!
 

Gizzy

A gentleman, a scholar, and a railway modeller....
26 Oct 2009
36,140
2,273
63
Cambridgeshire
www.gscalecentral.net
Best answers
0
Country flag
Nicely done Jon....
 

dunnyrail

DOGS, Garden Railways, Steam Trains, Jive Dancing,
Staff member
GSC Moderator
25 Oct 2009
26,174
4,993
75
St.Neots Cambridgeshire UK
Best answers
0
Country flag
Lovely job, just a thought though. My making the load the full dep of the Wagon they will be teicky to remove if you want Loads Out, Empties return. On the Opens you can open the Door and do it that way. I normally make the bottom of the load like half an H with the two legs about 1/4 in and the Ends quite thin. Or with your Solid Loads a flat in the Mifpddle Sloping towards the end would work.That way you can press one end and they will tip for easy removal. With your nice cutter you ought to be able to mod them for that,

New users think about this from the start. Here are a few pics showing my method for easy removal.

Underneath of load, I use Foamboard. My Foam Cutter is out of use just now.
image.jpeg
Showing a Coal Load in place.image.jpeg
Tipped for easy removal.image.jpeg
Sorry to hijack thread a bit, but felt thus might add to your superb work. The use of Clingfilm is an inspiration.

In 00 my friend burries a piece of Nail in the Load and removes them with a Magnetic Wand!
JonD
 
  • Like
Reactions: 1 user

Zerogee

Clencher's Bogleman
25 Oct 2009
17,351
1,723
North Essex
Best answers
0
Country flag
No problem at all, JonD - it's not thread hijacking, it's simply continuing the discussion and the more variations on a theme we put up here, the more ideas we and others can share and glean from each other! :)
I reckon your idea of the foamcore board platform combined with some of the vase filler "coal" that I've used would work really well. Oh, and I pinched the clingfilm idea from Gizzy, who most likely pinched it from someone else in turn - that's why it's great to keep these threads going.....!

If anyone else has some tips, ideas, ways they've done it slightly differently, photos of their own versions etc etc, please add them here..... :)

Jon.
 

The Devonian

Registered
17 Nov 2009
1,966
23
South Hams
Best answers
0
Country flag
Jo, that is a good representation of coal, nice work.

II have five Bachmann 3-bay coal hoppers (1:22.5) and those who have them will know that the plastic load does not look great. I was given some black granules, with the appropriate adhesive. These granules are what is used for kiddies play areas - a soft spongy surface avoiding a hard one should they fall.
I painted the adhesive on the Bachmann load and then applied the granules. The texture and appearance looks good - as far as I am concerned - and it waterproof and robust.

I had another two of the Bachmann loads that I purchased at a show a few years ago. I have nine Aristo 2-bay coal hoppers and wanted to sell a couple. I approached a local club but received no reply so I decided to convert the coal hoppers into ballast/aggregate hoppers. I had already painted the loads to simulate ballast finding that they fitted very well into an Aristo gondola (1:29).
The loads needing shortening by a couple of inches and the interior car side webs needed to be cut away in a small part to allow the new ballast/aggregate load to sit lower in the car than the coal load did. I am sure most of you know that aggregate is heavier than coal generally and cars are never fully loaded. I am pleased with their appearance and I now have a two cars of a category not represented on the O&NF railroad.

I only have a pic of the Aristo hopper conversion, no Bachmann one.
 

Attachments

  • 18-07-16_090021.jpg
    18-07-16_090021.jpg
    32.3 KB · Views: 0

Cliff George

Registered
24 Oct 2009
2,134
17
City of Chelmsford
Best answers
0
Country flag
Last edited:

Zerogee

Clencher's Bogleman
25 Oct 2009
17,351
1,723
North Essex
Best answers
0
Country flag
The black sealant is in interesting idea, Cliff - if you just use a single layer of the "coal", so that it's all in contact with the sealant base, I can see how it would work. Any lumps not in direct contact with the sealant would remain loose, of course, so you couldn't build up any depth to it. I could see it being better for the smaller scales, as your friend does, as it would take quite a bit of silicone to cover several LGB wagons' worth of area.
The PVA does dry slightly shiny, I agree - but for coal, which can have a bit of sheen to it in real life, I think that can be a bonus rather than a problem.

Jon.
 

Rhinochugger

Retired Oik
27 Oct 2009
36,716
4,240
North West Norfolk
Best answers
0
Country flag
I'm impressed - so, if I give you the dimensions..........................
 

Zerogee

Clencher's Bogleman
25 Oct 2009
17,351
1,723
North Essex
Best answers
0
Country flag
I'm impressed - so, if I give you the dimensions..........................

Thanks - I only wish that I had the time to do some for other people, but sadly I don't, it's taken me over a year to find the chance to do these few for myself - and I've still got another six or so hopper loads to make at some point..... ;)
Very happy to pass on any required details of where and how to get all the stuff to make them, though! :)

Here's the "coal" (or "gravel" if you buy the off-white stuff):
http://www.dunelm.com/product/core-coloured-gravel-filler-1000051209?searchTerm=vase filler

I can't find the orange/pink insulation foam that I used (I've had this particular pack in store for several years), but this looks like a very similar material, and in an even better colour!
http://www.diy.com/departments/jabl...-l1200mm-w450mm-t-50mm-pack-of-4/26831_BQ.prd

and this is the table-mount hot wire cutter, there are several people on evilBay selling similar units but this is the one I went for:
http://www.ebay.co.uk/itm/HOT-WIRE-...377321?hash=item3ac7ee2969:g:sGwAAOSwMmBV4wY5

Jon.
 

Rhinochugger

Retired Oik
27 Oct 2009
36,716
4,240
North West Norfolk
Best answers
0
Country flag
Yes - I don't have a train load to do, but the wagon that is taxing the grey matter is the Bachmann 1:20.3 low sided gon - this has side doors for discharge, but more importantly has a number of tie bars across the top of the wagon - presumably to stop the sides bulging out in the 1:1 world.

I need to build up a former that has three or four (sharrafter check) 'peaks' of coal between the cross bar ties.

A winter job methinks - too busy on the track construction just now :whew::whew::whew::whew:
 
  • Like
Reactions: 1 user

trammayo

Interested in vintage commercial vehicle, trams, t
24 Oct 2009
22,671
4,680
75
Co. Mayo
Country
Ireland
Best answers
0
Country flag
Bookmarked!
 

dunnyrail

DOGS, Garden Railways, Steam Trains, Jive Dancing,
Staff member
GSC Moderator
25 Oct 2009
26,174
4,993
75
St.Neots Cambridgeshire UK
Best answers
0
Country flag
Before Foam Cutters came along at sensible prices I made my own using some spare plumbing kit that was around, some wood offcuts and a piece of resistance wire from an old Electric Fire. Think I got the idea from Model Railway Constructer. Probably the ref on the Wood 5/94. Powered from my trusty HnM Duette. Did cause tthe Duette to trip out uf used for too long, but was a usable beast till I broke the Resistance Wire. I think that a Cutting Bed sat on the 2 Pieces of 2x1 Timber at either side with a Slit cut out to thread the Wire Through. The R Wire was passed through the Hole where 2 Wires are Soldered to a piece if Copper Tube. Passing to to Arm which was Tensioned by gently bending said arm whilst R Wire was secured via the Screw in the Drop Piece. About as crude as it gets.
image.jpeg
JonD
 
Last edited:

Zerogee

Clencher's Bogleman
25 Oct 2009
17,351
1,723
North Essex
Best answers
0
Country flag
Crude perhaps, but effective I'm sure, JonD! Your design is little different from the one I have, in practical terms. The only real difference is that I paid someone thirty-five quid so that I didn't have the job of building it myself.... ;)

If you have a steady enough hand to cut foam "freehand", then you can buy a simple plastic frame unit for just a few quid at a craft shop, which will run off an old-fashioned 4.5volt "bell battery" (which you can still buy from Maplins).

Jon.
 

dunnyrail

DOGS, Garden Railways, Steam Trains, Jive Dancing,
Staff member
GSC Moderator
25 Oct 2009
26,174
4,993
75
St.Neots Cambridgeshire UK
Best answers
0
Country flag
Your right Jon.

Continental Modeller, Page 180, May 1994 - Creating Large Scale Structures by W Davison.
Was a good article of a G Scale Railway built indoors. Buildings being Foam (Expanded Polystyrene) would survive outside OK. Have one in the Garden probably built around then that has been outside all that time.
JonD