Coach lighting - another one of my bright ideas.

ebay mike

Retired, but still hoarding. (GOF)
Country flag
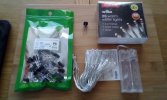
Being close to finishing my bar car for the smaller Orient Express rake my thoughts turned to interior lighting. Last Chxxxxxas I bought these lighting sets in Wilko's post festive sale. They were 25p rack (90% off!!!) so I bought 'a few', as you do. Worth it just for the two heavy duty AA batteries included. I want these to be track powered and have fitted the bogies with pick-up axles. The packaging states rated voltage is 3v and normal bulb rating 20 x 3.2v/0.064w. As these are obviously LEDs they require a DC input. Harking back to my days of Physics O level tells me a bridge rectifier is required. An Amazon purchase has produced a bag of said items. The packet says V(RRM):1000V & I(AV):2A. I am assuming these are the maximum loads and these will work in this scenario. I would like to feed the lighting chains via these rectifiers but need to know what value resistors have to be incorporated into the circuit. There are NO other components in the battery box other than an on/off switch. Would the resistor used be able to cope with the different track current input for either analog or DCC? I have a large bag of resistors put would appreciate any solution to include the band colour code so I can find the right one a little easier.
I also bought a box full of smaller chains from Poundland at 5p each, but these will remain battery operated as the PIKO coaches have plastic wheelsets.
Thanks.
IMG_20200806_195249.jpg
 
If you're going to use either analogue or DCC, then the input voltages are likely to be different. the easiest way is to use a Buck voltage step-down unit and set it to 3v - the rectifier needs to be in the circuit before the step-down unit as they have defined +ve / -ve inputs. They're pretty cheap on evilbay, especially if you buy more than one at a time ;);) or you can talk to Philp :nod::nod:
 
So if you are talking 24 volts, I would go for a 1k ohm resistor, maybe a little overkill but should be safe.
 
Wired in series or parallel? With 24v DC from the bridge rectifier, you could use eight in series I believe.

Geoff
 
The series/parallel question is a good one. Wiring in parallel is the simple approach, but wiring in series will be more efficient as all the LEDs in the string will share the same current. It's important to remember that you still need a series resistor to limit the current through the string, or maybe use a constant current driver module. The drawback with series is you need a higher voltage supply (enough to exceed the total forward voltage of all the LEDs in the series string), but for track powered coach lighting perhaps using a lower voltage regulator would allow the lights to stay on over a wider range of track voltage?

I bought a pile of voltage regulator modules from ebay years ago just in case I wanted to do coach lighting, but never got round to it. I pull one from the stores occasionally for my N gauge layout. There are loads of them on ebay for a couple of quid or less, but mostly they are DC input so will need a rectifier added.

This kind of thing:
DC-DC 3.8-32V to 1.3-35V Boost Converter Voltage Regulator Power Supply Module | eBay
They look good Nick but the trouble with this and other solutions above is my lack of skills. I don't 'do soldering' unless it's a Yorkshire fitting with a blowtorch. I tried soldering some jump leads on my points to improve continuity. No success with my soldering iron, but managed to set light to two with a mini gas torch. If I can't crimp it or use a chocolate block connector I don't stand a chance in hell. As most people know I am a believer in doing things on the cheap, so if it's going to be complicated I'll settle for fixing a battery box under the coach or inside under the roof.
 
They look good Nick but the trouble with this and other solutions above is my lack of skills. I don't 'do soldering' unless it's a Yorkshire fitting with a blowtorch. I tried soldering some jump leads on my points to improve continuity. No success with my soldering iron, but managed to set light to two with a mini gas torch. If I can't crimp it or use a chocolate block connector I don't stand a chance in hell. As most people know I am a believer in doing things on the cheap, so if it's going to be complicated I'll settle for fixing a battery box under the coach or inside under the roof.
The other day on this link I posted a YT vid on soldering, if you look carefully at this and give it a go you ought to able to pick up the relevant points of soldering, The tricks are not complicated and for what you are doing here ought to help you get going with soldering. Once you grasp the basics you should see no turning back.

 
They look good Nick but the trouble with this and other solutions above is my lack of skills. I don't 'do soldering' unless it's a Yorkshire fitting with a blowtorch. I tried soldering some jump leads on my points to improve continuity. No success with my soldering iron, but managed to set light to two with a mini gas torch. If I can't crimp it or use a chocolate block connector I don't stand a chance in hell. As most people know I am a believer in doing things on the cheap, so if it's going to be complicated I'll settle for fixing a battery box under the coach or inside under the roof.
Have a look at Layouts 4 you Mike, they do a great little kit that has a latching reed switch, I fitted three of them in some Hornby coaches, you place the reed switch on the underside of the roof, a magnet turns them on, and off.
They are powered by a button cell, and last for ages. You would have to solder though, if you want to try them, I could solder them foc ,obviously, for you.
 
They look good Nick but the trouble with this and other solutions above is my lack of skills. I don't 'do soldering' unless it's a Yorkshire fitting with a blowtorch. I tried soldering some jump leads on my points to improve continuity. No success with my soldering iron, but managed to set light to two with a mini gas torch. If I can't crimp it or use a chocolate block connector I don't stand a chance in hell. As most people know I am a believer in doing things on the cheap, so if it's going to be complicated I'll settle for fixing a battery box under the coach or inside under the roof.
Bring it over here, mate - I can do a bit of soldering ............. on a good day .............. with a following wind ;);)
 
Bring it over here, mate - I can do a bit of soldering ............. on a good day .............. with a following wind ;);)
Thanks for the offer Rhino, but I'm not sure I want to follow your wind! I'm going to have a play with the bits I've got and see how I get on first. I may get back to you in due course.
 
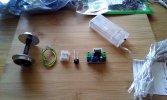
Package arrived from China (no dissidents found hiding inside). I assume I now have the necessary components for my interior lighting circuits. Parts are laid out below. In the absence of instructions with the buck thingies I presume I put a test meter across the V OUT terminals and gently rotate the brass screw on top of that blue bit until it reads 3v or as close as I can get to it before attaching the LED string.
IMG_20200821_131010.jpg
 
You may have to turn the screw a very long way, Mike, and then sometimes the range is quite fine when you find it.

You'll find out when you get to the end 'cos it clicks - but it doesn't fall off, you can just go back the other way. I nearly sent one back when I had some difficulty locating the adjusting range within the entire screw length.

When you're happy that you've got the voltage set correctly, put a dob of glue on the screwhead.
 
You will find it is something like a 15-turn potentiometer..
BUT

As we keep saying.. LED's are current devices, so you will still need a current-limiting device or resistor..
 
You will find it is something like a 15-turn potentiometer..
BUT

As we keep saying.. LED's are current devices, so you will still need a current-limiting device or resistor..
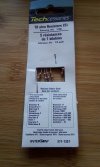
Would these fit the bill Phil?
IMG_20200821_165516.jpg
 
One of those will probably be fine.. - You can always tweak the voltage up a bit .. - For maximum brightness, with minimum smoke! :D

Now, there will be many who will tell you, that:
1. 1k is too big. - depends on voltage.
2. They have never, ever used a resistor, and have got away with it for years.
3. You should use a little 'grobber' (small, package of electronics / chip / integrated circuit) to limit the current.

But.......... Seeing as you have the 1k resistors... :):nod:

PhilP.
 
Back
Top Bottom