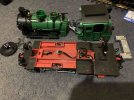
Discussion of opening my LGB 28002 so I can get at the decoder board.
There's a guide here for opening an LGB 28001. I'll particularly note points of deviation from that guide.
Starters:

Removing the electronics:
There's a guide here for opening an LGB 28001. I'll particularly note points of deviation from that guide.
Starters:
- The link in the thread to the 28001 breakdown doesn't seem to work. I accessed the 28001 guide here.
- The 28001 guide differs slightly from the 28002 guide. I will note the mappings. It might be easier to work from the 28001 diagram as it is less cluttered.
- Warning: each set of screws is subtly different. Keep track of which screws came from which holes.
- You will need a lot of space to work with.
- remove the boiler front panel & disconnect the headlights & smoke generator
- gently pull out the top headlight so it is not fastened to the front panel
- starting from the top, use a thin screwdriver to prise the front panel off the boiler. Work your way around and back gently and it will slide out.
- use a pair of needle-nose pliers to release the front headlight power cables. There are three pairs on pins stick up in front.
- the far left pair is the smoke generator. You can deal with those later if you prefer.
- There is a transistor to the far left. Don't pull this out by mistake!
- At this point, you can see the decoder mount in the front left of the boiler cavity, looking tantalisingly accessible. I couldn't access it safely. We'll need to completely separate the boiler in order to get at it properly.
- remove 10 screws:
- 2 long screws at the very front, near the front coupler. The single screw at the very front that holds the coupler can stay.
- 4 small screws under the connecting rods around the wheels.
- 2 small-ish screws at the very back corners of the cab
- 2 larger screws at the front of the cab
- Notes
- see diagram in other thread.
- You do not need to remove any screws in the centreline near the gearbox - 4 screws hold the gearbox together and 2 hold it on to the chassis. These can stay.
- at this point, the boiler and cab will almost pull off. You'll see that they are held in place by the pivots on the connecting rods that come through the plate.
- on the right side, use a thin flat-head screwdriver to pop rod #27/G (see pg 2 near bottom-right) off the base-plate in 2 places. You can then slide out the right-side pivot.
- on the left side, pop out the single pivot mount #30/TA. This frees the left-side pivot.
- 3 pieces are likely to come loose - 2 from the right side and one from the left. Put them somewhere safe.
- you can now ease the boiler and cab off the chassis.
- Watch out for the weight in the back of the cab - it will fall out!
- If you didn't disconnect the front lights earlier, you only have a few cm of slack in the wires, so be careful. The other wires have more slack.
- Pinch the boiler to free up the cab (see other guide)
- Gently slide the cab away from the boiler, sliding out the various pipes that run into the top of the cab.
- Note: the lower pipes are attached to the cab, not the boiler!
- You should now have enough slack to unplug the wires leading to the cab & chassis.
- For future reference:
- centre plug - ribbon 3 gray, 1 black. Goes to PCB above speaker (connected to function switch).
- left plug - ribbon 5 black. Goes to rear lights & external power feed.
- right plug - ribbon 4 black. Goes to motor & gearbox (on chassis).
- top-left plug - black/brown/black. Goes to chassis.
- top-right plug - blue/blue. Speaker wire.
- If the plugs are not co-operating, there are little lugs on the bottom that you can lever at with a flat-head screwdriver.
- For future reference:
- At this point, the cab is free and the boiler is attached by one more ribbon cable. Disconnect it.
- black 3-pin cable leading to front of chassis.
- You should now have the following loose pieces:
- front panel (with top headlight)
- boiler assembly
- chassis (with lower front headlights, gearbox, driver, etc)
- cab
- rear weight
- 10 screws
- 3 mounts for pivots for connecting rods

Removing the electronics:
- Under the boiler are 4 screws: 3 large, 1 small.
- Remove the 3 large screws. These hold the boiler weight and electronics in place.
- Loosen but do not remove the small screw.
- Make sure the weight doesn't slide out and fall!
- If your model is like mine, there's one more thing holding the electronics in place.
- Remove the round green closest to the cab.
- There is a red pole under the cab - the volume control!
- Make sure the boiler weight is not going to slide free, then gently but firmly pull the red pole out
- You can now slide the weight & electronics out of the boiler.
- Make sure you don't foul on the smoke generator wires. Remember to release them if you didn't do so earlier.
