ThomasDadDurham
Really Useful Engine
I havent made a thread for my layout build yet - but if you want a nosy and are still on the dumpster-fire that is Facebook, have a look Langley Sodor Railway Facebook.
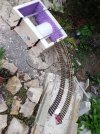
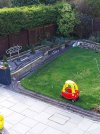
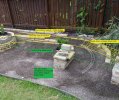
Heres an overview of what I built in summer 2024, and where the viaduct will be going:
Soldering iron and foam
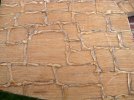
So this method all came about because of the astronomical price of Urethane Rubber. I wanted to make a completely bespoke viaduct to fit in an existing spot, as I'd already built the raised areas and inclines. I had seen a sectional mould that an American had made via Google, which I knew I could replicate, but the costs when I started estimating climbed rapidly, 3k plus for each mould section, potentially double or even triple that, given the cost increases since that fella had posted his work on another forum years ago.So I figured as concrete formwork is traditionally EPS/XPS, why not carve the brickwork into XPS with a soldering iron. Heres my proof of concept test:
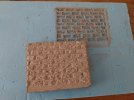
I liked the 'stone' effect the soldering iron gave, so I started mocking up what I needed with a wood template, then given the dimensions and that of the space I had a 3D model done up (had a little help here as Im rubbish at Blender) - with a metal section for maximum clearance for the tracks running under, and a gentle curve.
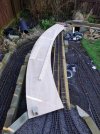
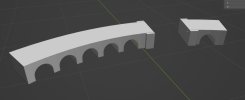
Next was finding someone willing to cut the forms for me - No way could I do this with a benchtop hot wire cutter, and the angles needed to be exact so it would fit in with the existing raised areas. Luckily I found one fairly easily: foamcutting.co.uk/. Heres the negative (the bits removed from the form)
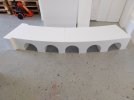
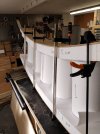
After a 5hr round trip, where I numbered all the bits on collection for re-assembly (they hadnt got the arches perfectly identical, so this became essential) the parts were brought back to my workshop, and re-assembled. I started reinforcing the sides by layering up thin ply, and clamping it while it dried. Finding an effective glue here was a nightmare. Resin-containing wood glues were recommended online, but they just didnt cut it for the wood-to-styrene. I did use wood glue on the layering of ply.
Contact cements melt styrene, so no go there. In the end, gorilla glue was the winner. But you have to clamp it well. LOTS of clamps. Because it wants to push the parts apart as it expands as it dries - what makes it so good for sealing two bits of porous foam together.
You can see as the ply is drying, the layer of paper I inserted to make a template for cutting the 'detail layer' of XPS.
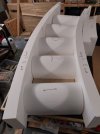
Marking up the XPS and carving. Oh, the fumes are very toxic so I had a professional filter mask on for this, plus my workshop has fitted extraction.
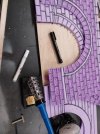
Starting to fit it all in.
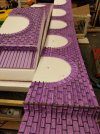
An early test fit of the long section
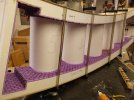
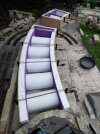
This is where Im at now!
Heres an overview of what I built in summer 2024, and where the viaduct will be going:


Soldering iron and foam
So this method all came about because of the astronomical price of Urethane Rubber. I wanted to make a completely bespoke viaduct to fit in an existing spot, as I'd already built the raised areas and inclines. I had seen a sectional mould that an American had made via Google, which I knew I could replicate, but the costs when I started estimating climbed rapidly, 3k plus for each mould section, potentially double or even triple that, given the cost increases since that fella had posted his work on another forum years ago.So I figured as concrete formwork is traditionally EPS/XPS, why not carve the brickwork into XPS with a soldering iron. Heres my proof of concept test:

I liked the 'stone' effect the soldering iron gave, so I started mocking up what I needed with a wood template, then given the dimensions and that of the space I had a 3D model done up (had a little help here as Im rubbish at Blender) - with a metal section for maximum clearance for the tracks running under, and a gentle curve.


Next was finding someone willing to cut the forms for me - No way could I do this with a benchtop hot wire cutter, and the angles needed to be exact so it would fit in with the existing raised areas. Luckily I found one fairly easily: foamcutting.co.uk/. Heres the negative (the bits removed from the form)

After a 5hr round trip, where I numbered all the bits on collection for re-assembly (they hadnt got the arches perfectly identical, so this became essential) the parts were brought back to my workshop, and re-assembled. I started reinforcing the sides by layering up thin ply, and clamping it while it dried. Finding an effective glue here was a nightmare. Resin-containing wood glues were recommended online, but they just didnt cut it for the wood-to-styrene. I did use wood glue on the layering of ply.
Contact cements melt styrene, so no go there. In the end, gorilla glue was the winner. But you have to clamp it well. LOTS of clamps. Because it wants to push the parts apart as it expands as it dries - what makes it so good for sealing two bits of porous foam together.
You can see as the ply is drying, the layer of paper I inserted to make a template for cutting the 'detail layer' of XPS.


Marking up the XPS and carving. Oh, the fumes are very toxic so I had a professional filter mask on for this, plus my workshop has fitted extraction.

Starting to fit it all in.

An early test fit of the long section

This is where Im at now!
- I need to finish the 'short section'.
- I need to drill through all the arches, run some threaded rod through it and use some big repair washers to clamp it all together. (Ever tried to find an 800mm drill bit? That was fun!) The F clamps alone arent enough for concrete, and if they failed the whole thing would just pop open! So its belt and braces. Threaded rod and big washers (as you would for concrete formwork normally) plus I'll leave the F clamps on the top as its poured in situ.
- Rebar to be cut and bent to reinforce.
- Im going to give the whole inside a brushed on coat of wax too, before pouring.
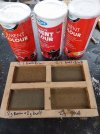
- Ive got some cement colours to experiment with - going for a sandstone shade to match the stonework/remind me Durham viaduct. It looks like I need to use a 5:1 ratio of buff to brown, and go easy on it, as the colours are STRONG when you add a lot, so a small amount will dye the concrete from its natural silver-grey to more of a stone-y shade. I'll have to carefully measure my mixes to ensure even colour throughout! Doing various experiment batches is my next job.
Last edited:

