MGates
Manager/Turnout Builder Llagas Creek Railways
I'm reposting this project of mine that I made a thread of on another large scale forum. I figured some of the PRR fans here would like to see!
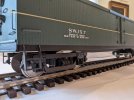
This is a car I have been working on recently over the past few months. I got a 53ft REA Reefer kit from Alan at GAL Line, and some Sierra Valley wheels from Jay at the Train Department for this project.
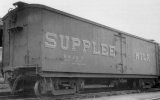
I originally was looking around for existing reefers in 1:32 scale that resembled something close to the old Supplee Milk cars that were hauled on the PRR during the steam era. I couldn't find anything and eventually posted on one of the Gauge 1 or G Scale groups online asking about something related to what was about to be a big 3D modeling adventure. I think I was asking about where I could get some passenger trucks like the ones seen used on the Supplee Milk car in photos. Ryan Bednarik responded and clued me into the GAL Line kits, and while they are a bit longer than what the actual Supplee cars were, I though they looked great and had the correct style of trucks to boot!
Beginning Kit Assembly
I do not have any photos earlier than this progress shot, but I can say that the kit is a delight to build. This is my first styrene model kit and I found the material easy to work, but also durable. The details are much better than those I have found on other laser-cut wood kits on the market. The kit includes parts cut from several thicknesses of black styrene.
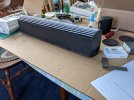
After getting the body mostly complete, I decided to modify the roof a bit to get closer to the real life Supplee Milk car. From what photos I could find online it looked like this style of car had a thinner landing pad from the ladders to the center walkway, which also included an "L" shaped grab bar. I used some scrap section of thin styrene with the wood slats cut, instead of the larger square landing pad included in the kit.
Paint and Decals
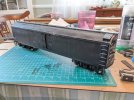
I put a coat of green paint on the roof/sides and matte black on the under frame and trucks. I have seen some O scale models of this car that use various shades of green and some have a black roof and some have the roof and sides green. I do plan to make at least one more of these cars so perhaps the next one I make will have a black roof. I'll see which color combo grows on me more after I get around to pulling them behind some locos once finished.
This is my first time using Woodland Scenics dry transfer letters and I am very pleased with how they turned out! I didn't want to use water-slide decals as I have never been too impressed with how they looked on models when I have seen picture online from model builders. Perhaps it is a particular art to get the decal to blend in well and not have noticeable edges, but I wasn't keen to go through all the trouble when the dry transfers seemed promising.
"SUPPLEE MILK" Lettering
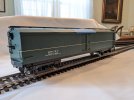
The car had metal letters cut out, painted, and bracketed on to the sides of the car. I had a bunch of various thicknesses of styrene left over from the sheets supplied in the kit so I figured I should make the side letters out of that. I made scale drawings of the lettering to be cut out in vector on the computer using a free open source program Inkscape. I have used this program a ton over the past ten years or so and actually prefer it over Adobe Illustrator for doing line work and scale drawing. I printed out the letters and attached it to the styrene with a healthy amount of Tamiya Extra Thin Cement.
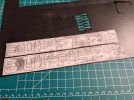
Lots of hobby knife cutting of letters with a #18 chisel blade and a sore neck later yielded me a bunch of fragile letters that I was worried would not cooperate nicely with paint. (foreshadowing)
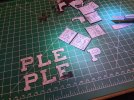
So yes, they did in fact NOT take to paint very well and curled up. The thickness I was going after was obviously not going to work very well in styrene. So I took to looking up some local laser cutting options and found a place near Strasburg, PA to cut the letters out of 22ga steel. I had them cut me out four pairs so that I can have a set for that second car I plan to make in the future.
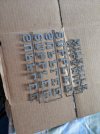
So before I cut the letters off the thin metal strips connecting them all together, they are spaced perfectly as they currently are. I drilled holes in the letters for stainless tacks to go through and afterwards lined the letters up on the car to drill corresponding holes on the side of the car. After this I snipped the letters off and started the very tedious task of masking the edges of the letters with 1mm masking tape after first spraying with titanium white.
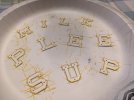
Then I added Testors red paint with a brush.
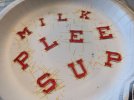
After removing the masking tape and using a hobby knife to scrape off any paint that bled under the tape I attached them to the car side!
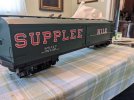
Some boo-boos with the paint on this set of letters, but I plan to weather the car a bit and will add some light rust/paint flaking on the letters in areas where the paint lines aren't too great. I found some 1mm o-rings on Amazon and used those under the letters to act as low profile stand-offs.
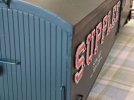
Future Plans
This is where I am currently with the car. I plan to tidy up the paint on the letters and start adding more detail parts like piping, brake wheel chain, the above-coupler buffers, hoses, extra steps for the center doors, and a bunch of scale rivets on the roof and frame. I will eventually get a resin 3D printer to make some of these detail parts since that will give me a finer resolution than my FDM printer.
I'll update this thread when I get around to working on the car some more. For now I got turnout orders to work on!
-Mike
This is a car I have been working on recently over the past few months. I got a 53ft REA Reefer kit from Alan at GAL Line, and some Sierra Valley wheels from Jay at the Train Department for this project.

I originally was looking around for existing reefers in 1:32 scale that resembled something close to the old Supplee Milk cars that were hauled on the PRR during the steam era. I couldn't find anything and eventually posted on one of the Gauge 1 or G Scale groups online asking about something related to what was about to be a big 3D modeling adventure. I think I was asking about where I could get some passenger trucks like the ones seen used on the Supplee Milk car in photos. Ryan Bednarik responded and clued me into the GAL Line kits, and while they are a bit longer than what the actual Supplee cars were, I though they looked great and had the correct style of trucks to boot!
Beginning Kit Assembly
I do not have any photos earlier than this progress shot, but I can say that the kit is a delight to build. This is my first styrene model kit and I found the material easy to work, but also durable. The details are much better than those I have found on other laser-cut wood kits on the market. The kit includes parts cut from several thicknesses of black styrene.

After getting the body mostly complete, I decided to modify the roof a bit to get closer to the real life Supplee Milk car. From what photos I could find online it looked like this style of car had a thinner landing pad from the ladders to the center walkway, which also included an "L" shaped grab bar. I used some scrap section of thin styrene with the wood slats cut, instead of the larger square landing pad included in the kit.

Paint and Decals
I put a coat of green paint on the roof/sides and matte black on the under frame and trucks. I have seen some O scale models of this car that use various shades of green and some have a black roof and some have the roof and sides green. I do plan to make at least one more of these cars so perhaps the next one I make will have a black roof. I'll see which color combo grows on me more after I get around to pulling them behind some locos once finished.
This is my first time using Woodland Scenics dry transfer letters and I am very pleased with how they turned out! I didn't want to use water-slide decals as I have never been too impressed with how they looked on models when I have seen picture online from model builders. Perhaps it is a particular art to get the decal to blend in well and not have noticeable edges, but I wasn't keen to go through all the trouble when the dry transfers seemed promising.


"SUPPLEE MILK" Lettering
The car had metal letters cut out, painted, and bracketed on to the sides of the car. I had a bunch of various thicknesses of styrene left over from the sheets supplied in the kit so I figured I should make the side letters out of that. I made scale drawings of the lettering to be cut out in vector on the computer using a free open source program Inkscape. I have used this program a ton over the past ten years or so and actually prefer it over Adobe Illustrator for doing line work and scale drawing. I printed out the letters and attached it to the styrene with a healthy amount of Tamiya Extra Thin Cement.

Lots of hobby knife cutting of letters with a #18 chisel blade and a sore neck later yielded me a bunch of fragile letters that I was worried would not cooperate nicely with paint. (foreshadowing)

So yes, they did in fact NOT take to paint very well and curled up. The thickness I was going after was obviously not going to work very well in styrene. So I took to looking up some local laser cutting options and found a place near Strasburg, PA to cut the letters out of 22ga steel. I had them cut me out four pairs so that I can have a set for that second car I plan to make in the future.

So before I cut the letters off the thin metal strips connecting them all together, they are spaced perfectly as they currently are. I drilled holes in the letters for stainless tacks to go through and afterwards lined the letters up on the car to drill corresponding holes on the side of the car. After this I snipped the letters off and started the very tedious task of masking the edges of the letters with 1mm masking tape after first spraying with titanium white.

Then I added Testors red paint with a brush.

After removing the masking tape and using a hobby knife to scrape off any paint that bled under the tape I attached them to the car side!

Some boo-boos with the paint on this set of letters, but I plan to weather the car a bit and will add some light rust/paint flaking on the letters in areas where the paint lines aren't too great. I found some 1mm o-rings on Amazon and used those under the letters to act as low profile stand-offs.

Future Plans
This is where I am currently with the car. I plan to tidy up the paint on the letters and start adding more detail parts like piping, brake wheel chain, the above-coupler buffers, hoses, extra steps for the center doors, and a bunch of scale rivets on the roof and frame. I will eventually get a resin 3D printer to make some of these detail parts since that will give me a finer resolution than my FDM printer.
I'll update this thread when I get around to working on the car some more. For now I got turnout orders to work on!
-Mike
